Wednesday, July 30, 2014

Pocket Door 5

Another rainy-day project I have done is work on the pocket door I made for the bathroom in the JayBee. I sanded the whole thing several times. Then I carved holes into the door to accommodate the hardware.

First, I carved the holes needed for the pull out handle that will go on the edge of the door.


Then I carved the two holes on either side of the door--for the side handles. Here's a rough hole about a third of the way through the process.


Here is the same hole, all done and ready for the handle.


A side handle set in place.


Both a side handle and the edge handle set in place.


I think I want to stain the door. Unfortunately, I think there are some glue stains on the door that I cannot sand off. How could I have been so careless?! I think of myself as being meticulously careful when working with glue--but the stains are there nonetheless. I have to keep pondering this one.

Also see:
Pocket Door 1
Pocket Door 2
Pocket Door 3
Pocket Door 4
Pocket Door 6


Pantry Cabinet 7

I have now installed door handles on the pantry cabinet. I haven't decided on a closing mechanism. Magnets? Latches? Don't know yet.


I purchased some sample milk paint colors and I have started experimenting.


The milk paints have no VOCs and clean up with water. I have also purchased a non-toxic poly whey finish; I'm experimenting with that as well.

Also see:
Pantry Cabinet 1
Pantry Cabinet 2
Pantry Cabinet 3
Pantry Cabinet 4
Pantry Cabinet 5
Pantry Cabinet 6
Pantry Cabinet 8
Pantry Cabinet 9

Roof Rafters 13

The rafters in the north dormer are slowly proliferating. Slowly because I keep taking breaks for rain. (How did today's forecast of 0% chance of rain turn into a torrential downpour and then showers throughout the day?!) It is so much work to peel back the tarps from the roof of the JayBee (and put them back afterwards) that I need to be assured of having hours to work rain-free or it's not worth it to begin.

I hit some challenges working in tight spaces. I couldn't get my drill on some of the screws...until I remembered I had this tool that I had never used before. It allows you to turn screws around a corner, and it did the trick.


The next bit will be to install the rafter tails that hang from the dormer out over the top of north wall.

I have been working on my list of rainy-day projects, so I have a few more posts to write. Stay tuned.

Also see:
Roof Rafters 1
Roof Rafters 2
Roof Rafters 3
Roof Rafters 4
Roof Rafters 5
Roof Rafters 6
Roof Rafters 7
Roof Rafters 8
Roof Rafters 9
Roof Rafters 10
Roof Rafters 11
Roof Rafters 12
Roof Rafters 14
Roof Rafters 15
Roof Rafters 16
Roof Rafters 17
Roof Rafters 18
Roof Rafters 19
Roof Rafters 20
Roof Framing Wrap-Up


I was on the road today, returning my son to the Appalachian Trail. I hadn't seen him since he began hiking the trail in Georgia back in March. (See his blog.) He took two days off to take a break and skip out on some torrential rain. At least it wasn't raining when he started hiking again today.

Figuring out where he was headed:


He was all groans as his worn-out knees complained over the initial uphill. Much steeper hills to follow!


Saturday, July 26, 2014

Roof Rafters 12

Before I could build the dormers, I had to be sure the JayBee was level because I need a level base to have any hope of installing level ridge boards in the dormers. Surprisingly, even with all the frost upheavals over the winter and spring thaw, the JayBee was very close to level. I used a bottle jack to adjust three of the support posts--until the JayBee was perfectly level.

The night after I finished leveling the JayBee, we had heavy thunderstorms. All that water threw the JayBee slightly out of level. Rather than adjust it all again, I waited a day for things to dry out, which returned the JayBee to level.


I had been struggling with carrying all the fasteners I use (four different kinds of screws and one type of nail) plus various drill bits and hurricane ties up into the rafters and having them accessible when I need them. Early on, I gave up on carrying them in my tool belt and put them in a plastic container. (See container on the left in the photo below.) With everything mixed together in the container, I had a hard time grabbing just the right thing when I needed it, while also holding a rafter in place. During a recent lunch break, I made a new container to hold my stuff.


I'm happier now!


The dormer ridge boards have two angle cuts on their top edge and two angle cuts on their inner ends.


I built a jig to use to help me prop up a dormer ridge board while I make marks and calculate for cuts.


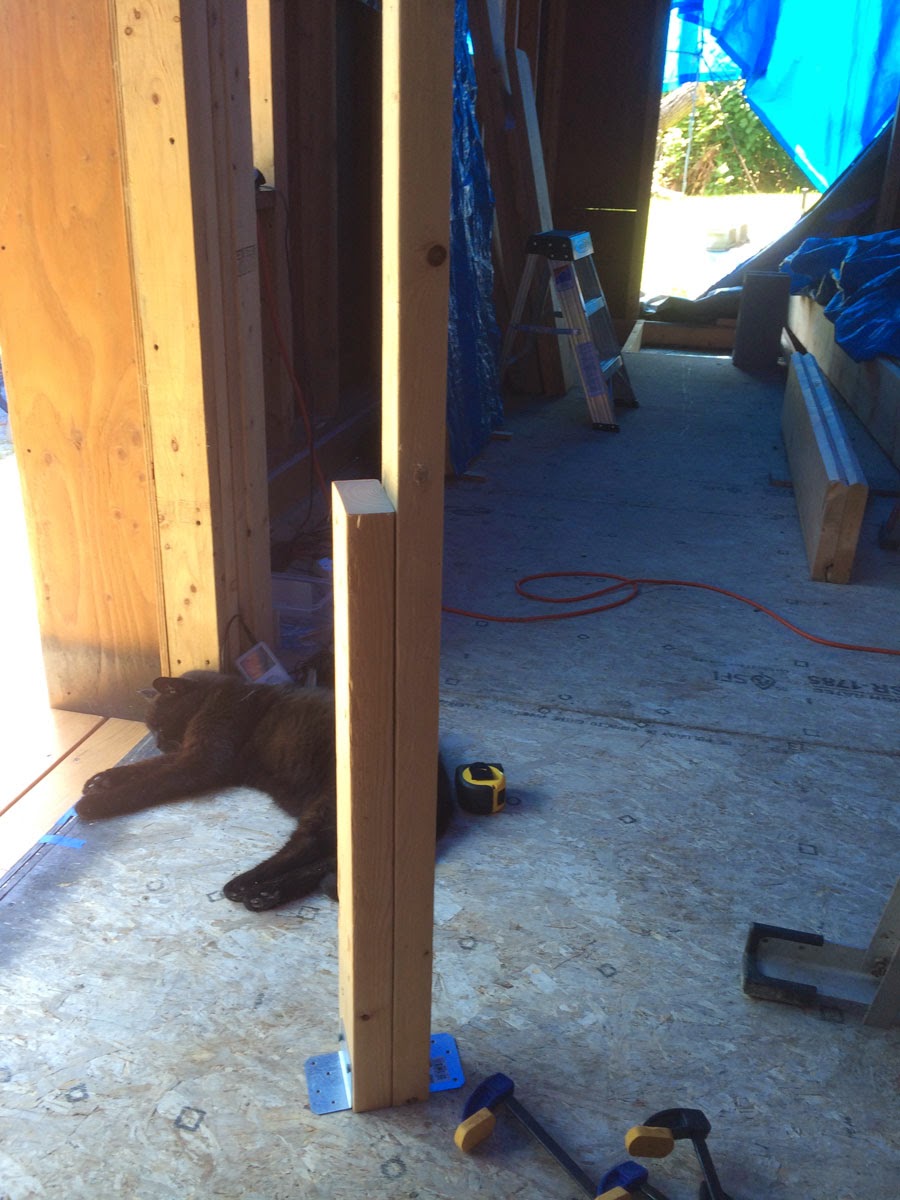
Then I built a permanent support post...


and installed it with the dormer ridge board.


Also see:
Roof Rafters 1
Roof Rafters 2
Roof Rafters 3
Roof Rafters 4
Roof Rafters 5
Roof Rafters 6
Roof Rafters 7
Roof Rafters 8
Roof Rafters 9
Roof Rafters 10
Roof Rafters 11
Roof Rafters 13
Roof Rafters 14
Roof Rafters 15
Roof Rafters 16
Roof Rafters 17
Roof Rafters 18
Roof Rafters 19
Roof Rafters 20
Roof Framing Wrap-Up


A dog raced through the yard a few evenings ago. Next thing I knew, Bear was way up in a tree. Poor thing! It's not really fair that dogs are allowed to run loose; my cats should feel they are safe from terror in their own yard.


On another day, Bear rested  safely above ground and watched me peel the tarps off the JayBee to begin work.


George just kept doin' his thing.


Tuesday, July 22, 2014

Roof Rafters 11

My days are filled with problem-solving. Mostly I've been calculating angle cuts, but I also keep trying to strategize to make the work a bit easier. I've been having trouble juggling everything I need to have with me when I'm working up high. On the south side of the JayBee, I can set things on top of the small entryway. Working on the north side is more challenging because there's nowhere to put things. Here is one solution I crafted--a series of bowline loops that I hang a bunch of clamps in so they're within easy reach and I'm not constantly knocking them down and having to go fetch them. (I have also worried that I'm going to concuss one of my cats when I drop these things!)


That solution has been working so well, I have started to hang my hammer as well.


Once I had the big diagonal rafters installed, the others started going a tiny bit quicker. Not as much quicker as I had hoped, but somewhat.


Next up: Framing the dormers on the south and north sides of the roof.

Also see:
Roof Rafters 1
Roof Rafters 2
Roof Rafters 3
Roof Rafters 4
Roof Rafters 5
Roof Rafters 6
Roof Rafters 7
Roof Rafters 8
Roof Rafters 9
Roof Rafters 10
Roof Rafters 12
Roof Rafters 13
Roof Rafters 14
Roof Rafters 15
Roof Rafters 16
Roof Rafters 17
Roof Rafters 18
Roof Rafters 19
Roof Rafters 20
Roof Framing Wrap-Up


For any of my readers who think my cat Bear (the white one) is pretty, let me say this: No amount of pretty makes up for serious deficits in character. I don't know if Bear has some kind of brain injury, or if he was abused in a former life, but he is known to scratch/bite on occasion, without provocation. (He fairly regularly pounces on George, which is probably no small part of why George doesn't like him.) Yesterday as I was standing outside the JayBee, looking up at the rafters and formulating a plan, Bear charged me for no reason and clawed my leg--both front...


...and back.


This is where he hid out (on top of that lumber pile) when I let him know he was to get nowhere near me for awhile.


Friday, July 18, 2014

Roof Rafters 10

I took a few days off of rafter work to wait out the rain. The break was a good thing. It allowed me to do more downsizing and culling of some of my stuff, and I went back to work on the rafters with renewed energy.

Luckily, I noticed that this spider had taken up residence in my dust mask before I put it on!


While I was taking my break from rafter work, I mulled things over. I also did some research about hurricane ties. I didn't come up with a tie that will work with my diagonal rafters, but I did come up with the idea to use GRK screws in the meantime.


Once the sun came out, I added another diagonal rafter...


...and another one.


Also see:
Roof Rafters 1
Roof Rafters 2
Roof Rafters 3
Roof Rafters 4
Roof Rafters 5
Roof Rafters 6
Roof Rafters 7
Roof Rafters 8
Roof Rafters 9
Roof Rafters 11
Roof Rafters 12
Roof Rafters 13
Roof Rafters 14
Roof Rafters 15
Roof Rafters 16
Roof Rafters 17
Roof Rafters 18
Roof Rafters 19
Roof Rafters 20
Roof Framing Wrap-Up


Bear climbed up the ladder to join me in the rafters today.


He kept hanging out with me, sitting in my lap on the scaffolding...


...so I stood up to try to convince him to go back down to the ground. Then George came in the JayBee. Thankfully, rather than George joining us up in the rafters, Bear chose to go back down.