Saturday, July 30, 2011

North Wall 2

Doesn't the following image look familiar?


It really is not the same image as in my last post. Yesterday I picked up more lumber using my new method--this time 1x4s. Guess it didn't take me long to get comfortable transporting lumber this way!

Here is the rest of the north wall as it was being assembled:


Dale came by and helped with adding the sheathing late yesterday. We got lucky; it didn't start to rain until we were done.

Bear was just exhausted!


This morning, Dale and Arlen came over to raise the wall. It was so exciting that it fit together--a bit of a risk when you build a wall in two pieces. (I have no idea what Arlen is pointing at...)


In the following photo, notice the notches high up on the studs. Ceiling joists will be set there for the lower loft over the bed. The ceiling joists for the higher loft will all be bolted to the sides of the studs that are 24" on center. It was trickier on the east/bed end of the house because the loft does not nicely line up with the 24" o.c. studs.


Look how straight this wall is!


I spent the rest of the day futzing with the rest of the sheathing. Finally, the north wall was done! (It would have been nice to take a picture of the whole wall, without the tarp covering part of it, but it's so much work to get the tarp positioned correctly, I didn't bother moving it.)


And covered for the night...


Also see:

Thursday, July 28, 2011

Good Day!

I had one of those days today--a day when everything seemed to tick along well. The weather cooperated--a mix of clouds and sun, and no rain. I started early, only to discover first off that I needed a longer 2x4 than I had in order to begin the next bottom plate. I've never transported lumber longer than 10 feet in the back of my tiny car. I did not want to get derailed from making progress, so I dug out the "load stops" I'd purchased for my car's roof rack years ago and headed to the lumber yard. As I loaded 12- and 14-foot 2x4s on the roof of my car, the lumber-yard man helping me said it looked like I'd done this a lot because I appeared to know what I was doing. Ha! (I've heard this feedback before; even if I've never done something before, I can fake it well. :-)

I made it home with my load of lumber in fine shape.


I worked all day on the JayBee. Even when I made a major error that made me re-cut some pieces of lumber, I didn't get discouraged. I just kept plugging on. (The error: I second-guessed my framing drawings. As I started to mark and cut some of the studs that will hold the ceiling joists for the lower loft over the bed, I couldn't figure out why they were so long. I decided the drawing was wrong and cut them shorter. Then, as I started assembling the wall, it dawned on me that I'd made those studs so long in the framing drawing because the wall extends down outside the floor. Duh! At least I discovered this before I'd gone too far with the wall assembly. And screws are a lot easier to undo than nails!)

I was so into what I was doing today that I didn't realize I'd forgotten to take pictures until after I'd covered and put away everything at the end of the day. If the coming thunderstorms hold off tomorrow, I'll have another wall done.

Wednesday, July 27, 2011

North Wall 1

First let me say that, although the temperature has been better these last few days (not so heat-wave hot during the day, and cool at night), the on-again, off-again rain has been a bit challenging. During one of the on-again moments yesterday, after I'd covered everything up yet again, Bear and I went down to the river to take a break.


I know people have been eagerly awaiting the first wall. Does two-thirds of a wall count? After I assembled the bottom-plate edge of most of the north wall, the top-plate edge had to be propped up on the wheel well to assemble it. Holding everything in place and driving a screw can take me awhile, when I'm doing it alone. Dale and Arlen came by this afternoon, and then progress sped up a lot. It's amazing how those extra hands can speed everything up! We kept the wall propped on the wheel well to glue and screw the sheathing to it. (Sorry my butt is facing the camera in these shots!)


I stapled sill seal (pink, styrofoam-like stuff that comes in rolls) to the sills, then Arlen and Dale tipped the wall up into place. Arlen and Dale attached braces to keep the wall plumb, and Arlen screwed the bottom plate down to the sills.


And Arlen and Dale hammed it up a little...


It's not the whole north wall, but it's most of it! The whole dealing with the wheel-wells-in-the-way thing made it clear that the long walls had to be assembled in pieces. Now that the wall is up, it looks so simple; it makes me wonder just what took me so long in assembling it. I'd like to think that I now have a system and will be speedier assembling the other walls, but I'm not so sure. (The north wall is pretty basic compared to the others, even if it has the wheel-well complication.)

Now when I cover the JayBee for the night, it looks like a boat!


In fact, my whole yard sort of looks like a tent city.


Also see:

Monday, July 25, 2011

The Beginning of Walls

This morning started with a lot of fog...


but it burned off pretty quickly.


I have spent a few days now trying to dive into building the JayBee's walls. It is simply stunning how much time I can spend pondering and wondering--spinning my wheels with all the possibilities and all the considerations that affect what must happen first--to the point of paralysis. Finally! I started cutting wall framing pieces. I had all the pieces cut for the west wall (the simplest wall, so the one I felt comfortable starting with) when I decided I really had to build the north wall first. So, I stored away the pieces for the west wall and began to cut the pieces for the north wall. It is challenging building a wall on the JayBee subfloor because the headers over the wheel wells get in the way. I finally had a system going, and was moving right along, when it started to rain!


The forecast is for thundershowers tomorrow; if that doesn't happen, maybe a wall will get done!

New Drawings

One of the things that has kept me busy for the last week or so was completely re-drawing all of the framing drawings for the JayBee. Before I could begin building walls, I needed up-to-date framing drawings that incorporated all the changes that have occurred since the trailer arrived (and I could take more accurate measurements) and I made some crucial framing decisions (like using 2 x 6 floor joists so none of the wheel wells would be above floor level on the inside), etc.

So, here's the new floor plan:


[If you click on the image, you can see a larger version of the floor plan in its own window.]

More Entryway Dubbing Around (Entryway 2)

When I have just a moment (rather than a long stretch of time available) or when I'm spinning with indecision or paralysis about taking the next big step, I find little things to do on the JayBee. Yesterday, I drilled drainage holes in each bay of the entryway.


Then I attached insect screening and hardware cloth to the underside of the holes.


Hopefully this means that any water that makes its way between the cedar boards of the front step will drain out of the entryway and that no insects or other critters will make a home for themselves under my front step.

Next step on the entryway: Add some roof underlayment to protect the wood and direct water toward the drainage holes.


Also see:
Entryway 1
Entryway 3
Entryway 4
Entryway 5
Entryway 6
Entryway 7
Entryway 8

Saturday, July 16, 2011

Subflooring 2

I began the day knowing that I needed to install the pressure-treated boards in the entryway and install a bottom on the bedroom bumpout before Dale and Arlen arrived to help with installing more subflooring. So, the entryway looked like this before I glued and screwed the boards in it.


I forgot to take an "after" photo of the entry (but you'll see it later in a photo that shows some insulation installation) because I quickly moved on to cutting a board for the bottom of the bedroom bumpout.


There are times that I think I am the queen of workarounds. How is a person supposed to hold a board up against the underside of something and put screws into it at the same time? I used clamps to hold the board in place. Then I laid on my back on the ground to put in the screws.


After the board was glued and screwed, I added some spray insulation along the cracks/intersections for good measure.


Next, I moved on to installing more insulation in the floor bays. Notice the completed entryway in this shot as well.


Dale and Arlen arrived and started working on subflooring. We absolutely cooked out there! The sun was beating down from above and reflecting off of the radiant barrier at the same time.


I finished installing batts of insulation...


while Dale and Arlen continued cutting and installing plywood.


Even though it looks like Arlen is standing on the radiant barrier and insulation in this next shot, he actually has his feet positioned over some joists.


Before I could screw down all of the plywood sheets, Bear just had to check things out.


After I screwed down all the plywood, things looked pretty good!


Phew! I'm ready for bed...and the sun has not begun to set yet.


Also see:
Subflooring 1

Thursday, July 14, 2011

Subflooring 1

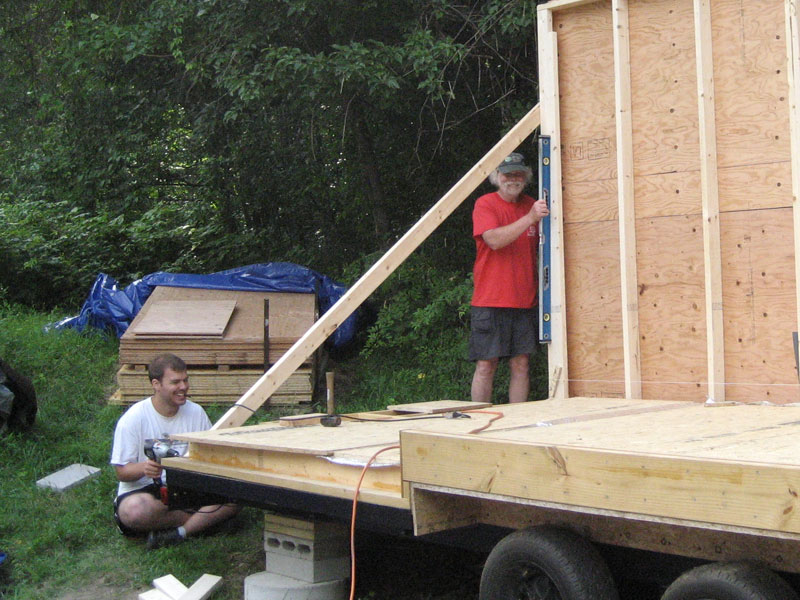
Dale and Arlen came over tonight to help me with installing subflooring. What a huge help! For me to wrestle around pieces of 3/4" plywood by myself would have taken forever.

First, we installed 5.5" batts of Roxul insulation in the bays between the floor joists. (Roxul is a stone and wool mixture that is flame retardant and will not absorb moisture. It also has borax in it so insects are not attracted to it.) This stuff is fun to work with! It is easy to cut with a serrated knife and it firmly holds itself in place against the joists. Easy! (I'm now thinking I might want to use this in the walls and ceiling as well...)


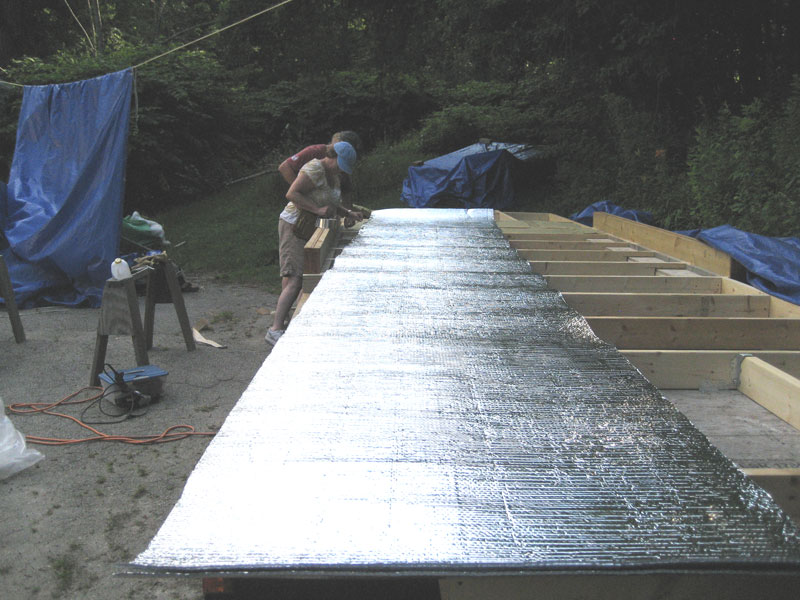
Then we worked on installing the radiant barrier. This type has a double-thick layer of air bubbles between two foil layers. It will serve as both a radiant barrier and a vapor barrier. It is supposed to add R14 to the surface on which it's installed. (See my previous post about radiant barriers.) We started by cutting two long pieces, laying them on top of one another...


and then taping the long edges together on one side with special foil tape.


Then, we opened it up and laid it in place as one huge sheet.


We did not staple it down or anything because the plywood held it in place just fine for us to attach the plywood to the joists with screws. That first piece of plywood installed so smoothly, we decided to install two more. First, we filled four more bays with insulation.


We tried a couple of methods of holding the edges of the radiant barrier in place so we could set the pieces of plywood down and still have the edges of the radiant barrier stick up beyond the edges of the plywood.


It took a couple of tries. The method that worked was to tape the outside edges of the radiant barrier with duct tape. Of course! Is there anything duct tape can't fix?


The plywood had to be cut before putting it in place, because it had to fit between the headers over the wheel wells.


We set the pieces of plywood in place, fitting together the tongue and groove edges, and screwed them down to the floor joists. Three pieces done! (This represents the floor of the kitchen, the laundry area, and half the living room. :-)


The subflooring for the rest of the living room and the bedroom will be installed this weekend. I will get the insulation all installed, and then Dale and Arlen will come over and help with the plywood. The bathroom end will wait until a plumber takes a look and has a clear idea about the location of wastewater lines. (Speaking of which, why is it that I cannot get a plumber to call me back?! I had thought this would be a good time to get this kind of help because tradespeople would be eager for the work. Apparently I was mistaken.)


Also see:
Subflooring 2

Tuesday, July 12, 2011

Entryway 1

Today's project was cutting the pressure-treated pieces of lumber to create the outer framing for the tiny entryway on the JayBee. I haven't done the time-consuming part yet--the gluing and screwing--but imagine two cedar boards sitting across this framing as a step, and you'll get the idea of where this is headed.


Creating this tiny entryway requires a lot of extra work, materials, and time, but I think it will add so much to the functionality of the entry and so much attractiveness to the house's overall design that I think it is worth it.


Also see:
Entryway 2
Entryway 3
Entryway 4
Entryway 5
Entryway 6
Entryway 7
Entryway 8

Sunday, July 10, 2011

Bedroom Floor Joists

Clearly I need to be more realistic about just how much I can accomplish in one day. I work all day, but I guess I'm a methodical (plodding) worker. I didn't get to the subflooring today, but I'm happy with the progress I made this week.

I started the day with the boards cut for the east end (bedroom) bumpout.


I cut notches in the boards so they cantilever out over the east end sill.


Then, I chiseled the inner end of each joist to flush fit a joist hanger.


I connected the joist hangers, more braces, and some toe-screws to hold everything in place.


I attached a board across the ends of the cantilevered boards. Not sure what that board is called.


Finally, I installed blocks between the cantilevered boards along the east end. Done! Isn't it beauteous? It seems a shame to cover all this work with subflooring so that no one can ever see it. Dale suggests a plexiglas floor, but that's not exactly what I had in mind. :-)