Sunday, October 30, 2011

Surviving the First Storm

We didn't get hit as hard with this first snowstorm of the season as some of the states south of here were hit. The snow came down so heavy and wet that there were stretches when it was really raining more than snowing. I woke up several times during the night--either from the wind or from hearing the bricks slam into the side of the JayBee. At 6:00 I awoke with a start because I heard a noise that sounded like one of the huge tarps had taken off in the wind and was soaring above the house. I bolted out of bed (well, as much as my sad body can bolt these days) and checked outside. Thankfully, the tarps were still covering the JayBee and the lumber piles in the yard. (I still have no idea what made the noise that woke me up.)

After the sun rose, this is what the JayBee looked like. I assumed that there must be some moisture getting inside the JayBee from the snow sitting on the tarps (after all, those tarps have been through a lot and are not in pristine shape any more), but I didn't worry about it.


By mid afternoon, the sun came out and the snow continued to melt. I managed to catch a bit of the effect of the high wind in this next photo.


When I went out to check the inside of the JayBee, I was pleasantly surprised to see that the inside was completely dry!


Saturday, October 29, 2011

Blizzard Prep

After the difficult week I've had, the last thing I wanted to hear was that snow (and maybe even a blizzard) was headed here this weekend. It's not even November yet! Autumn so far has been mild enough that even the plants have been confused; check out these new flowers.


When I returned home late last night, I found that the tarps on the JayBee had blown around again. (This after the western end came uncovered on Tuesday and Dale came over to help get it recovered--since I couldn't climb around and wrestle with heavy tarps with my dysfunctional back. I used a cane all week, saw the chiropractor three times, and was basically miserable all week.) I left things as they were last night.

I was amazed to find that I could get out of bed this morning without crying--without even a whimper. Good timing for a significant improvement in my back because I needed to get things ready for a major snowstorm. So much for my preferred plan: to lay low all weekend so my back could really heal.

I needed to re-cover the JayBee...


and move lumber and saws out of the plow's way.


I spent about an hour wrestling with the tarp that hadn't completely blown off the house. It was frigid out there!


Then I began moving all the bits and pieces. I moved carefully and slowly--to preserve my back as much as possible. I used the wheelbarrow in creative ways to keep me from lifting heavy loads. I used long boards as a ramp to get the saws inside the JayBee.


Finally, I had the driveway ready for snow and plowing.


I re-stacked and consolidated the remaining lumber piles and made sure they were well covered. The last thing I did was finish covering the JayBee. Instead of relying on the bricks to hold the tarps in place (since that has not been working very well in high winds--duh!) I tied the tarps to the underside of the trailer. Hopefully the tarps will stay in place during the coming storm.


Done at 6:00. Phew! (Snow was forecast to start at 7:00 but didn't actually start until after 8:30.) I am not moving tomorrow! My back is due for some real pampering.

Monday, October 24, 2011

Roof Rafters 7

When I packed everything away at dusk on Saturday, this is what I had done.


It is almost as challenging to cut some of the blocks as it is to cut the angle cuts on the rafters. Here is the block for the southwest end corner after I finally had it ready.


Guess who was all over me and in the way? No, not Bear!


The blocks along the south wall were easy to cut and install by comparison.


I even cut the corner rafter to the right length--in anticipation of some sheathing going up.


I was feeling on a roll. Before moving on to continue the northwest corner of the roof, I decided to drive some long screws through the ridge board and into the rafters on the opposite side. As I was driving the tenth screw, I felt a sudden *sproing* in my lower back. Brought me to a dead stop--but I did not fall off the ceiling joists. (I'm into counting my lucky stars.) It took a half hour for me to climb down the ladder and inch my way into the house. I was done for the day!

Dale and Arlen came over late in the day and installed the first piece of roof sheathing. A very exciting moment!


Update on back injury: When I first got out of bed this morning, walking was so painful I was nauseous and sweating profusely. Not good. Stayed home from work and saw my chiropractor late in the day. Walking is a little easier now. Baby steps...


Also see:
Roof Rafters 1
Roof Rafters 2
Roof Rafters 3
Roof Rafters 4
Roof Rafters 5
Roof Rafters 6
Roof Rafters 8
Roof Rafters 9
Roof Rafters 10
Roof Rafters 11
Roof Rafters 12
Roof Rafters 13
Roof Rafters 14
Roof Rafters 15
Roof Rafters 16
Roof Rafters 17
Roof Rafters 18
Roof Rafters 19
Roof Rafters 20
Roof Framing Wrap-Up

Saturday, October 22, 2011

Roof Rafters 6

It was dark with clouds all day today. Had one period of drizzle but, thankfully, no downpours.

The first thing I did on the JayBee today was fix the last rafter I installed last weekend. I decided it needed adjustment so the top of it was laying in the right plane.


Then I began cutting boards to use as blocking between the rafters. I figure it is easier to install the blocks before the roof sheathing is installed.


I got more done than this, but it was too dark when I finished to take a photo. Back at it tomorrow!


Also see:
Roof Rafters 1
Roof Rafters 2
Roof Rafters 3
Roof Rafters 4
Roof Rafters 5
Roof Rafters 7
Roof Rafters 8
Roof Rafters 9
Roof Rafters 10
Roof Rafters 11
Roof Rafters 12
Roof Rafters 13
Roof Rafters 14
Roof Rafters 15
Roof Rafters 16
Roof Rafters 17
Roof Rafters 18
Roof Rafters 19
Roof Rafters 20
Roof Framing Wrap-Up


Sunday, October 16, 2011

Roof Rafters 5

I began work on the JayBee today by removing the tarp from the west end of the house and taking pictures of the corner rafter I installed at dusk yesterday.


I left this rafter long for now; I will cut it to the right length when I put up the trim boards on the outside of the rafter tails.


This was one of those instances where Bear joined me up on top of the house and then complained when I left him up there alone.


Next, I worked on the last rafter needed for the southwest corner of the roof. After climbing up and down the ladder about four times as I made each cut on the rafter, I thought I had it ready to install. I actually thought, "Hey, maybe I'm understanding this enough to get a little momentum going." Ah, wrong. On that last trip up the ladder to install the rafter, it was horribly obvious that I'd totally misunderstood the last cut. Aargh! I started all over. Below is a photo that compares the two rafters. The one on the right is the one I cut first. The one on the left is the one I eventually installed. Notice that the angle cuts on the closest edges are different; what was required was the compound angle cut on the left rafter. (By the way, the holes I'm drilling along the top edges of these end rafters are for air circulation on the underside of the roof.)


And here it is installed:


I even had time enough today to cut and install the first end rafter for the northwest corner of the roof.


Dale and Arlen say they'll help with roof sheathing next weekend--weather permitting, of course. A bit of progress!

And for those of you who enjoy Bear's antics...


I even managed to capture Bear's whining/complaining!


Also see:


Saturday, October 15, 2011

Roof Rafters 4: More Challenges and Obstacles than Progress

I know many of you have been wondering if I'm making any progress and if I'll have a roof on the JayBee before the snow flies. Believe me, I'm wondering too...

Two weekends ago, it poured all weekend. I made no progress on the rafters for those two days. After going out to the JayBee to pour accumulated water off of the tarps covering the house about eight times each of those two days, I finally figured out a way to prop up and weight down the tarps so they stopped accumulating water.


The new method worked through the pouring rain at the beginning of the following week. Then...very strong, gusty winds blew the tarps off the house--even though there were rocks and bricks hanging on the grommets around the edges. (No one's been hit in the head with a brick yet--even if I occasionally walk into one ;-) --and, thankfully, there's no glass yet installed in the JayBee.)


Do you see the tail end of our little buddy in this next shot?


Last weekend was unseasonably HOT and sunny all weekend. I worked on roof rafters all weekend. Due to the great weather, there were a lot of boaters out on the water, and these little railway carts went by as well.


Here's another moon-on-the-water shot from that weekend.


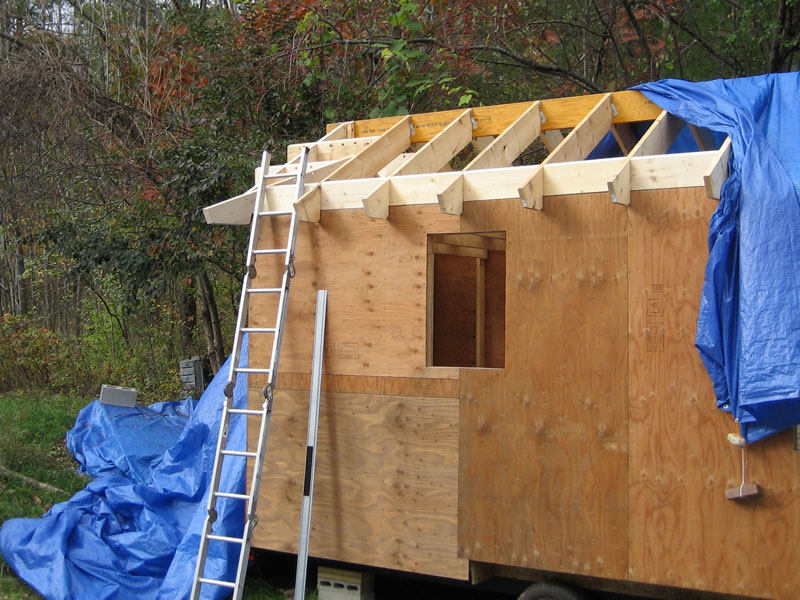
At the end of a complete weekend of working on rafters, what did I have done? ONE three-foot rafter. Why only one? I went up and down the ladder a gazillion times, cut many pieces of wood, even had the rafter installed at one point only to have to remove it completely and start over. The multiple compound angle cuts are giving me fits. I think I understand now why people don't frame roofs this way.


Bear slows me down as well. When I'm up on the ceiling joists, he endlessly whines and cries--until he figures out how to climb up and join me--and get in my way.


When I climb down to cut a board, Bear whines and cries until he figures out how to get back down--and get in my way.


Since we had a couple more days of rain this week, I was pleased to see this morning that almost no water had gotten inside the JayBee--even though the tarps had begun to blow off in the high winds that arrived during the night.


When I lifted my gaze above floor level, though, I gasped. Look at how much water collected in one of the tarps!


There was no way to lift this up over the top plate to drain it, so I put a garbage can under it and popped a hole in the tarp to drain it.


As the water drained and the strong winds continued to blow, the tarp kept shifting and lowering even more.


While the water was draining, I replaced all the GRK fasteners that secure the wall bottom plates to the headers over the wheel wells with longer screws. I'd been meaning to do that for some time, so it felt good to finish that. Over two hours later, the water was finally completely drained, and I poured it out of the JayBee. (It amounted to one and a third garbage cans full!)

I spent awhile repositioning the tarps and re-anchoring them with bricks, etc.

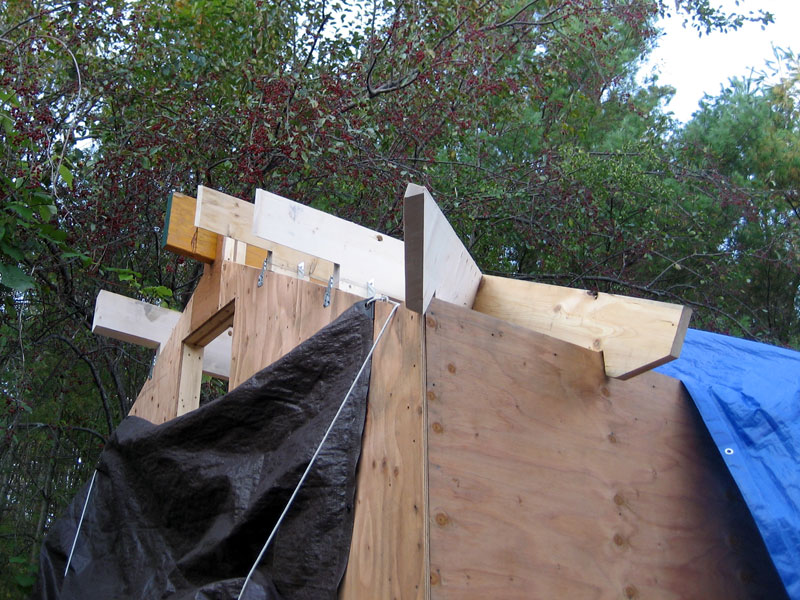
Finally, I continued work on another rafter I began to cut last weekend. In the following photo, I was trying to position my compound miter saw for a cut--until I realized it would not be able to make the cut I needed.


So, I made the cut with the hand saw.


A bunch more trips up and down the ladder, and then I made some more hand cuts.


I was up on the ceiling joists, finally beginning to install this rafter, when I felt rain drops. I sensed that this was going to be bad, so I rushed to cover the roof with tarps. Thank goodness I moved fast because next came a big clap of thunder. I was thinking, "Oh great. Here I am sticking up above the roofline of my house wrestling with tarps--just where the lightning is likely to find me!" Just as I was finishing securing the tarps, the sky opened up; water and HAIL rained down. (If you have any trouble seeing the hail in this next shot, click on the image to see a larger version of the photo.)


By the time I covered my miter saw, it was already drenched. First time it's ever gotten wet. I was drenched, too, but as soon as the rain stopped I got back to installing the rafter. I finished the installation, but it was too dark by then to snap a photo.

::: sigh ::: I'm trying, but progress is moving at a snail's pace these days.


Also see:
Roof Rafters 1
Roof Rafters 2
Roof Rafters 3
Roof Rafters 5
Roof Rafters 6
Roof Rafters 7
Roof Rafters 8
Roof Rafters 9
Roof Rafters 10
Roof Rafters 11
Roof Rafters 12
Roof Rafters 13
Roof Rafters 14
Roof Rafters 15
Roof Rafters 16
Roof Rafters 17
Roof Rafters 18
Roof Rafters 19
Roof Rafters 20
Roof Framing Wrap-Up