

Building my own shelter on the banks of the Kennebec River.
Step One: Building the JayBee.
Monday, December 20, 2021
Saturday, December 18, 2021
Plumbing! (AKA Plumbing 3)
As long as I've been working on this project--yes, many years--I have found it nearly impossible to hire trades people to do the plumbing and wiring on the JayBee. (Maine has a lack of people working in the trades and the ones we do have are booked solid for many months in advance with way bigger projects than mine.) Luck has been with me this year, thank goodness. Not sure why, since all the trades are more tightly booked this year than ever--even going out to 2023 in some cases. I'm just embracing the luck, though, and counting my blessings.
In mid November, I heard a rumor from some neighbors that a former state plumbing inspector lives nearby, is now retired, and takes on occasional plumbing jobs. When I called him, it turned out he had been the state plumbing inspector when I reported the plumber-thief years ago. I recognized his name, and he recognized my name and the case; that's small-town Maine for you! He was skeptical about working on a tiny house, but he agreed to stop by and see my project. After seeing it, he agreed to finish up my plumbing!
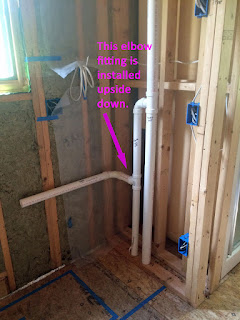
My new plumber wanted to change four things about the plumbing that had already been done. First, he pointed out that an elbow installed on the kitchen-sink drain line had been installed upside down. Note how it curves upwards instead of down. Makes me shake my head. That's why I hired out the plumbing--so it would be done right. I had not noticed this mistake.
Next, he didn't like that the drain line for the washer was going to put the p trap under the floor--making it susceptible to freezing. Third, we debated how to vent the washer. I didn't want another hole in the roof for a separate vent, and I didn't want a bunch of vent line cluttering up the loft as it snaked across to tie into the bathroom vent. The Code Enforcement Officer agreed that we could use an air activation valve on the washer--as long as it would be accessible in case it needed to be serviced down the road. Finally, the plumber didn't like that the water line to the outdoor faucet did not have its own shut-off valve.

The plumber was very excited after his first full day of work, so I stopped by after my work day to check it out. When I drove up, I saw a lot of plumbing supplies lying on the slab, but I didn't see that much work had been done.

When I got down on my knees, though, and looked up on the underside of the JayBee's floor, my jaw dropped. Even though I was fully aware of every plumbing fixture in the house, I just didn't envision how much piping was going to be required underneath the house. I'm sure glad I didn't try to figure out this maze by myself!


On subsequent days, the plumber fixed the drain line to the kitchen sink.

He ran water lines to the bathroom sink and toilet.

He ran water lines in and out of the water heater, and over to the washer. He also brought the water line up through the floor (missing the support beam for the trailer underneath) and over to the water heater.

Now the washer's p trap is above the floor (in the conditioned space), and the outdoor faucet has its own shut-off valve.

The washer is vented up the wall of the closet and is capped by an air activation valve (on top of the vent pipe).

The last bit the plumber did was wrap the water line under the house with heat tape and insulation.

There was no way not to have the p trap for the shower underneath the house, so I built a box around it to insulate it.

I loaded the box with insulation...
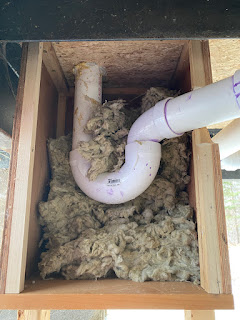

After I finished adding insulation to the box, I screwed its last side onto it.

The only plumbing things left to do are: connect the two sinks, install the toilet (flooring has to go down first), and turn the water on. I don't want to turn on the water until all the electrical boxes are live and functional, the house has functional heat, and I have the skirting installed around the outside of the house. I have my work cut out for me!
Also see:
One additional thing I've done recently: I hung this heater in the bathroom. It's installed higher on the wall than recommended--but it's the only place it would fit in the bathroom. I have an identical heater that will be installed in the living room--down at the height that it belongs. The two heaters, along with the electric radiant heat in the floor, should keep the JayBee nice and toasty!

Sunday, December 5, 2021
Anchored Down
Since I have no intention of moving my tiny house for the foreseeable future, I wanted to be sure to anchor it to the foundation. That way, when we have a high-wind storm, blizzard, or hurricane, I won't be worrying that the house will get knocked off its foundation. (You've all seen storm-aftermath photos with mobile homes tossed around like straws, correct?) The excavator guys thought this was completely unnecessary. They were impressed with how much more heavy and strong the JayBee's trailer is (and the home itself)--compared to what comes standard on a mobile home. These guys have a lot of experience with mobile homes and, apparently, it's common not to anchor them around here. To appease me, however, they kindly installed ten anchor points in the JayBee's slab foundation. (See the last photo on this page to see all the anchor points.)
When doing my research, I learned that a single-wide mobile home set up in Florida (hurricane central) would need to have four anchors installed on each end (8 total!) in order to meet code. I could only find a couple of places where I could secure an anchor strap to the JayBee's trailer--two near the tongue end, and two near the back end. Thus, my decision was made: I would go with four anchors--two on each end. Not one of my four trailer-anchor locations was near one of the ten anchor points installed in the foundation, however.
Plan B: Install four new anchor points in the foundation.
I felt incredibly intimidated taking on this project. I had never drilled into concrete before. I just kept reminding myself that this couldn't be as hard as removing the axles and springs, and I pulled that off so, surely, I could do this, too. I bought a masonry drill bit to use with my hammer-drill, and I used the air hose on my compressor to blow the cement dust out of the hole as I drilled. For each anchor point...
I drilled a 3" hole in the concrete, and hammered an expansion bolt into the hole. Then, I used my air impact wrench to tighten down on the nut--which makes the sleeve over the bolt expand and anchor itself in the hole. (I had no idea when I bought the air impact wrench to remove the axles that I would need to use it again so soon!)

I then attached the anchor point (the black piece in this next photo) to the bolt in the concrete. The anchor strap slides into a slit in the specially-made anchor bolt (not easily, I might add!) that fits securely into the anchor point...

...and everything gets tightened up.

It took me all day, but I got all four anchors installed. Peace of mind! (And maybe a break on my homeowner's insurance since I took this step.)

Saturday, December 4, 2021
Pocket Door Now Works!
One of the longest-running projects I've had in the JayBee is the pocket door and its wall leading into the bathroom. I built the door starting in 2012. I built the wall for it in 2015. I hung the door in 2016. I replaced the door stop for the wall with a removable one in 2020. (Hmm... This might be another entry in the "you know you're taking too long..." series.)
For years now, I've had the door tied to the door stop because the wall was not plumb so the door did not hang exactly in the middle and, because it hangs free from the top, it could easily swing from side to side and scrape the half-studs or even slam into them. Even when I warned visitors not to move the door, it was too tempting; everyone who sees it wants to operate it. So--I tied it down, to keep it from moving and getting damaged.


Most pocket doors are hung in a wall that is built with 2x6s. Every inch counts in a tiny house, so I purchased this kit that allowed me to install the door in a wall only 3.5" deep. It has half-studs reinforced with metal to accomplish this.

In the photo below, you can see that the door was hanging unevenly in the wall. This edge was too close to the righthand half-stud; the other edge was too close to the half-stud on the other side.

Now that the house is level, I could finally plumb up this wall. I removed the screws holding the base of the studs to the floor, moved the studs until they were plumb, and reattached them to the floor.
Then, I decided to make use of these occasional holes in the metal reinforcing on the sides of the studs.

I cut boards to length and put pocket-screw holes in the ends of them.

I used the boards to span between the two half-studs on each side of the wall.


Now the door slides back and forth in the wall without scraping and crashing.


For a little extra insurance, I wrapped each of the new boards with leftover strips of sill insulation.


Voilá! A functioning pocket door. Now the door can be moved in whatever direction makes it easiest for the plumber to do his work.
That's the great news! The plumber is back in touch, and he will be doing the rest of the plumbing work in about a week.

Also see:
Pocket Door 1
Pocket Door 2
Pocket Door 3
Pocket Door 4
Pocket Door 5
Pocket Door 6
Wall for Pocket Door
Pocket Door Wall Done!
Dubbing Around the Edges (includes new door stop for pocket door)
Wednesday, December 1, 2021
Progress Since Moving Day
Before the excavating company left me to my own devices, they leveled up the JayBee on stacks of cinder blocks.


They finished burying the electric lines that run from the pole to both the new shop and to the JayBee.

They also finished up the top of the driveway and made a nice little walkway to the front door.


After they left, I tweaked the leveling a bit to fix a low corner. Since I don't plan to ever move this house, I want it right before I anchor the house to the slab!

The electrician came and finished bringing the power from the power pole to the panel in the JayBee.

I only have one working outlet inside the house at the moment because the prior electrician did not label a single wire he installed. I have a bit of work to do to get everything labeled before the panel can be all hooked up.
I found a plumber who said he could do the rest of the plumbing during Thanksgiving week, so I scrambled to get things ready for him. I stacked the tires more compactly under the JayBee to help give the plumber some maneuvering room.

Next came removing the axles and springs. Honestly, this had not even been on my radar. I just figured I'd leave the axles and springs attached--hanging out under the house. Once the plumber showed me, however, it was obvious there was no way he could plumb to the septic line under the house because the axles and springs were in the way. I could not find anyone who could do this work in the timeframe I needed it done, so I decided to do it myself. The thought of taking this on scared the livin' daylights out of me but, once I figured out how to disconnect the brake wiring from each axle end, I was on a roll. I bought an air impact wrench and a new face shield, and got all set up to start dismantling.

The air impact wrench worked great on all the nuts connecting the springs, but I could not maneuver it to reach the nuts holding on the u-bolts. For those, my arthritic hands had to make do with hand wrenches. It took me almost three hours to get the first one completely dismantled, but I did it!

Before letting all the axles drop to the ground, I propped them on boards and bricks so I could roll them to the correct side of the waste line while they were still up above it.

Finally, I got all the axles and springs off. The axles are stored up off the concrete, on pieces of plywood. I coated all the various nuts and bolts in a thick layer of grease and stored them away. See how the plumber can now access the waste line under here?

While I was sitting inside the JayBee, listening to a podcast and greasing up trailer parts, look who came to visit! I don't know his name, but he regularly wanders over from the neighbor's yard. Makes me wish George and Bear were still here to move into the JayBee with me.

I moved everything out of the end of the JayBee that has plumbing runs to make it easy for the plumber to get to things.


...and hung the on-demand water heater.

I also installed the front steps--to make getting in and out of the house a whole lot easier. Railings and the rest of the deck to come--but probably not until spring.

Here's the bad news: The plumber did not show up, and he has not been in touch. The one phone number I have for him rings forever and then disconnects, so I have not been able to leave him a voice message. <sigh> I'm beginning to think I might end up buying some plumbing tools and doing this work myself. Stay tuned...
Subscribe to:
Posts (Atom)