Saturday, October 31, 2015

Roofing 13

After I installed the awning window yesterday, I cut and installed the roofing pieces on the east end bumpout. Tedious work! I still have to install five pieces of roofing trim on the bumpout...


Today, Dale came over to help with more roofing. We made good progress!


We got the east end of the north roof and the north gable done--except for the ridge vent.


Also see:


Autumn kitty cat!


Friday, October 30, 2015

East Awning Window

Well, I changed my mind. That's nothing new, of course. All this time I have waited on installing the awning windows because I thought I should get the roofing installed on the bumpouts first. This all has to do with the fact that there is so little clearance between the sill of these windows and the roofs on the bumpouts. While preparing the opening for the east end awning window, however, I decided that the windows should get installed before the roofing. So--here it is! The east end awning window installed.


In all of the 24 years I have lived here, my pear trees have never produced more than a bunch of scrawny deformed pears--only good for feeding the deer. This year, I have so many substantially-sized pears, I am making delicious pear sauce from the crop!


I caught the October supermoon before the sky turned dark.


Monday, October 26, 2015

Roofing 12

The first thing I noticed when I began work on the JayBee this morning--the glorious, sunny, bright, colorful day!


I installed the roofing pieces along the north side valleys.


I cut the opening for the east end awning window and flashed the bottom edge of the opening. Can't install the window, though, until I get roofing on the bumpout.


Also see:
Roofing 1
Roofing 2
Roofing 3
Roofing 4
Roofing 5
Roofing 6
Roofing 7
Roofing 8
Roofing 9
Roofing 10
Roofing 11
Roofing 13
Roofing 14
Roofing 15
Roofing 16
Roofing 17

Sunday, October 25, 2015

Roofing 11

When we began working on the roofing again yesterday, it was sunny and nice. In less than an hour, the day became raw cold, with occasional spitting snow--of course.

Since the three usual suspects are all in some of these photos, maybe it's obvious we had an additional helper. Thanks, Steve, for the photos and the help!


Once we finished the angle cuts around the south gable, we zipped right through the rest. Full sheets of metal roofing can go up fast! The south side of the roof is now done.


If you see blue lines in the valleys, those are the remaining remnants of the painter's tape we used to mark the diagonal cuts. I'll get it all off there eventually.


Also see:
Roofing 1
Roofing 2
Roofing 3
Roofing 4
Roofing 5
Roofing 6
Roofing 7
Roofing 8
Roofing 9
Roofing 10
Roofing 12
Roofing 13
Roofing 14
Roofing 15
Roofing 16
Roofing 17


Right around suppertime tonight, we had a short-lived, torrential rain. Then the sky turned pink!


Monday, October 19, 2015

Roofing 10

I used the templates I made to cut the metal-roofing pieces for the roof valleys.


This involves making diagonal cuts on the top and bottom edges, cutting a notch to fit around the gable roof peak, and pounding flat the upper portion that must lay flat against the main roof peak.


By myself, I managed to install valley pieces along the southeast valley...


... and the southwest valley.


This last weekend, my loyal helpers Arlen and Dale came over to help install sheets of metal roofing.


We all agreed that, if my roof was straight from end to end, or even if I had installed shed dormers instead of gable dormers, we could have easily installed all the roofing in one weekend. But, no, of course not. (All of you who know me may chime in now...) If there's a way that is more difficult, time-consuming, and/or complicated, that is how I will do it! After installing one complete sheet of metal roofing, all pieces that followed had to be custom cut to fit around the south gable.

To add even more complication, it began to shower. Then...


... it began to hail. Yes, hail. On and off... shower, hail, sun, shower, hail, sun.


Arlen started sliding around--losing all traction on the roof. Notice in the photos that he started to counterbalance his weight across the roof peak instead of relying on any traction to hold him up there. For safety reasons, we quit for the day after installing only two sheets of metal roofing.


That night, we had our first frost of the season. And it was a big one! The frost on the JayBee roof was thick the next morning.


Once the roof dried off in the sun, we went back to work. It was cold (warmer when the sun was out!) but we got into a bit of a rhythm. Each roofing piece had to be custom cut to fit the south gable.

Then, it began to snow! We were so surprised, we kept thinking it was pollen. But, no, it was snow. If you look closely at the photo below (it will be bigger if you click it and open it up in its own window), you can see snow on the metal roof--and snow falling as well. Arlen kept saying that of course it was snowing--it's a requirement that it snow during a roofing job. I had been trying to keep us off the roof in 90-degree weather, but I hadn't intended to install it in the snow!


When we quit, we had two gable faces roofed, including the gable ridge vent...


... and one quarter of the main roof covered (with no ridge vent yet).


Also see:
Roofing 1
Roofing 2
Roofing 3
Roofing 4
Roofing 5
Roofing 6
Roofing 7
Roofing 8
Roofing 9
Roofing 11
Roofing 12
Roofing 13
Roofing 14
Roofing 15
Roofing 16
Roofing 17

Crawling Along

Thank you, faithful followers, for not giving up on me completely. I have been slowly making progress on the JayBee despite my failure to post regularly.

Here is further progress on the closet wall.


Below it is set in place. See how there is a ladder (for reaching high-up storage in the closet, and for climbing up to the storage loft) inside the closet wall? Once I set this wall in place, I immediately noticed that the closet ceiling light fixture was placed too close to the ladder.


I moved the light fixture back close to the JayBee's outer wall. (Also see in the photo below that the shower stall has been brought inside the JayBee; it is currently sitting where the toilet will be installed.)


I installed the portion of the air exchanger that protrudes through the north wall of the JayBee.


I haven't installed all the interior parts (that require a finished interior wall), but I did install the filters inside it.


On the outside, I used a leftover piece of ice and water shield...


...and installed the exterior vent. (I didn't realize until after the fact that this photo was also a headless selfie.)


The vent sits above the double north window.


The electrician came back one last time because he had neglected to wire up the thermostat that will control the electric radiant heat. In the photo below, the lower box is where the wires from the electric-radiant flooring panels will be connected. The upper box in the photo will house a light switch. Above that is another junction box that will house the thermostat.

Notice also in the photo that there is a wire that runs across this side of the shower-stall wall. I decided it was going to complicate installing my kitchen cabinets, so...


... I moved it into the wall instead.


During one of my JayBee-building days, my brother enjoyed a kayaking adventure on the river. I just happened to see him returning.


I got a really good deal on a portable garage that I plan to use for storage during the winter months. This will give me a temporary, weather-protected place for materials that get delivered without having to fill up the interior of the JayBee--allowing me to work on the inside of the JayBee unencumbered during the winter months.

I began setting up the garage by myself--assuming that I would hit a point when I'd have to ask others to come over and help. 10' x 17' didn't sound very big to me--until I started putting the thing together. Here are the roof-framing pieces together.


Then the side pieces added.


The garage came with 18"-long anchors that screwed into the ground; I securely attached them to the framing pieces.


One end cover put on.


Then the other end.


Then the roof and side walls. Finally, additional metal framing pieces were installed about six inches up from the ground along the inside of the side walls.


I managed to build the whole thing myself! I like it. It's spacious and bright inside. Now to see how it holds up through the snow.


The pear trees kept dropping pear bombs while I was assembling the garage beneath them. Just when I thought I found a large, perfectly-shaped pear, I discovered that a deer had found it first!


Also while I was putting the garage together, a whole bundle of turkeys came parading through. I snapped about a dozen photos, but each photo only captured one or two turkeys each.


In the space of two days, a very LARGE fox ran through my yard twice in broad daylight. I attempted to capture it in photos, but I ended up with a lot of photos of leaves and trees. (Yes, it made me wonder how my indoor-outdoor cats have remained alive all these years...)

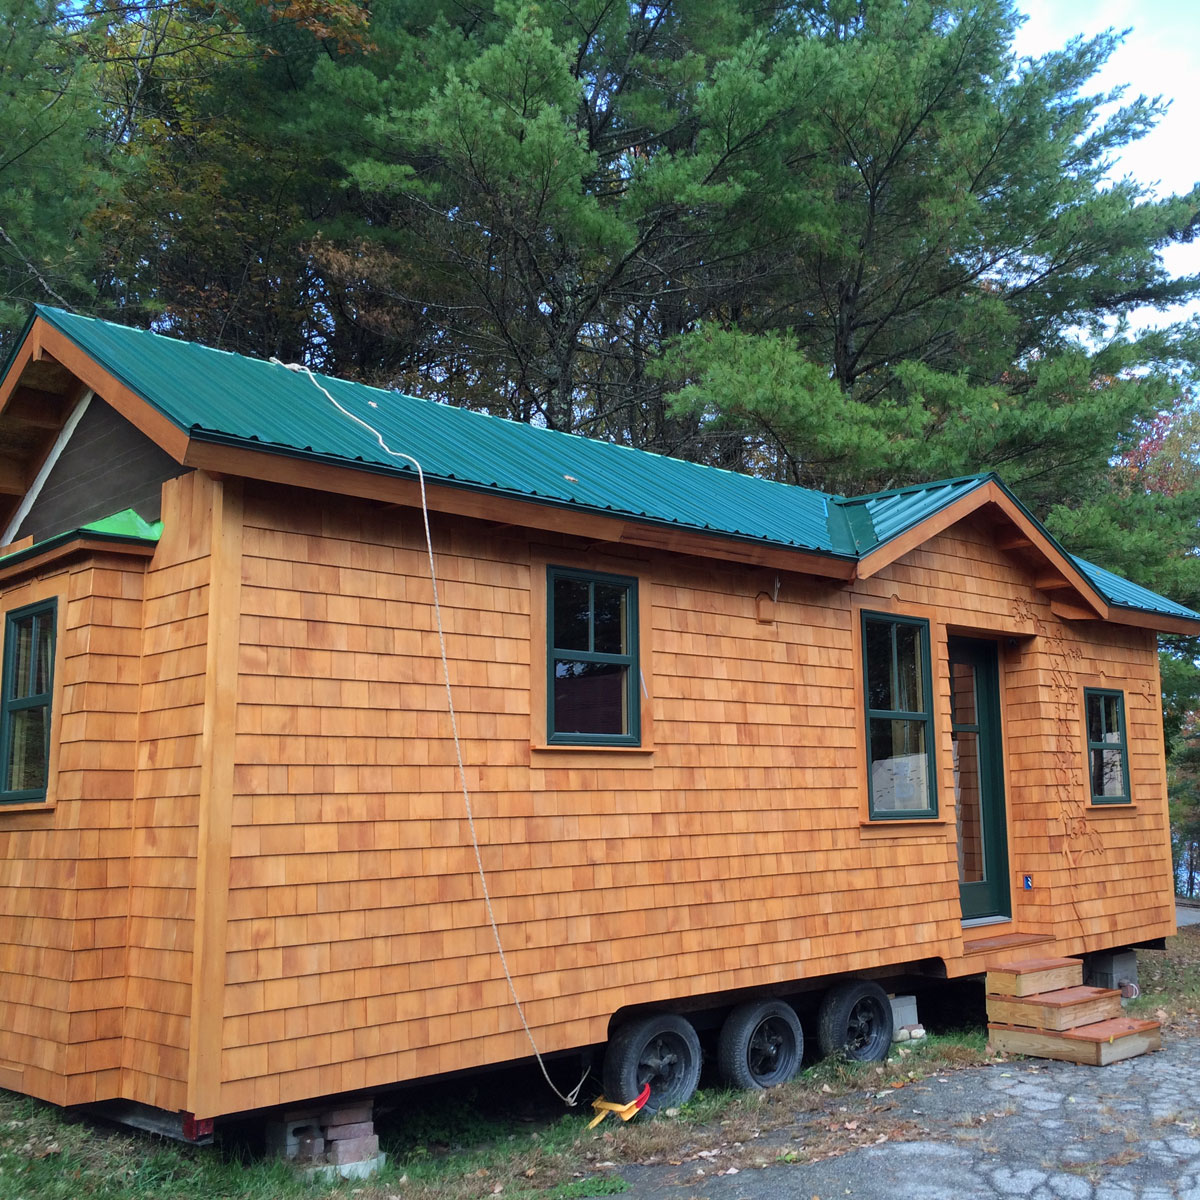
Speaking of leaves, I don't have brilliantly-colored leaves around my house. Around here, the oak and ash tree leaves turn a dull yellow-brown and then drop off.  My river view is starting to open up again, however.


From the roof of the JayBee...


When I drive to work, I see brilliant fall colors. When I look out the window while sitting at my desk at work, I can watch this tree going through its autumn changes.


Beautiful night sky the other night. This was actually a crisp, perfect quarter moon--not well captured in this photo.