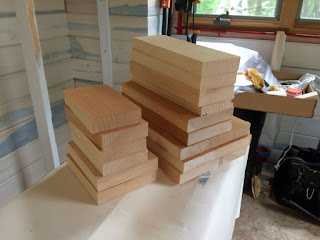
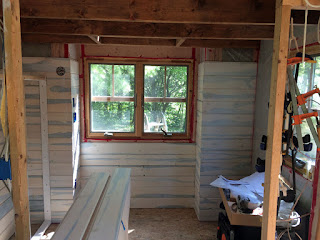
I added one row of boards in the bathroom.
I also made more progress in the bed alcove and living room.
The boards are up high enough now that I'm beginning work in the east-end, reading-nook loft.
Also see:
Interior Walls 1
Interior Walls 2
Interior Walls 3
Interior Walls 4
Interior Walls 5
Interior Walls 6
Interior Walls 7
Interior Walls 8
Interior Walls 9
Interior Walls 11
Interior Walls 12
Interior Walls 13
Interior Walls 14
Interior Walls 15
Wednesday, June 27, 2018
Interior Walls 10
Categories:
bathroom,
paint/stain/colors,
tiny house,
walls
Friday, June 22, 2018
Interior Walls 9
Progress on the south wall of the bed alcove...
Progress in the bathroom...
Progress in the bathroom...
Also see:
Interior Walls 8
Interior Walls 10
Interior Walls 11
Interior Walls 12
Interior Walls 13
Interior Walls 14
Interior Walls 15
Interior Walls 10
Interior Walls 11
Interior Walls 12
Interior Walls 13
Interior Walls 14
Interior Walls 15
Categories:
paint/stain/colors,
tiny house,
walls
Saturday, June 16, 2018
Mystery Boxes
While waiting for various coats of stain, paint, and polyurethane to dry on wall boards, I built these three boxes. What do you think they are for?
I'm calling them speaker boxes.
My plan for my surround-sound speaker system is to have most of the speakers embedded into the walls, so they don't stick out into the living-room space. I decided I needed to install these alcoves for the speakers now, so the wall boards can be installed right up to their edges.
First step: A detailed drawing and cut list.
Here are the pieces I cut for three speaker boxes.
I sorted the pieces into boxes to be sure I didn't mis-cut anything. If you notice that the bottom box is deeper than the other two--good eye. Two boxes are going into walls that are only 2.5" thick. The other one is going into a wall that is 3.5" thick.
Here are the boxes assembled.
First layer of paint applied. The small hole you can see in the bottom of the closest box is for passing the speaker wire into the box. (Yes, I have a wired--not bluetooth--sound system.)
First speaker box done and installed. I set a speaker in the box to demonstrate how it will work.
In the next shot, you can see the two boxes installed on either side of the bed alcove.
The third box is done. It will be installed in the wall of the closet that is currently laying on its side in the middle of the JayBee as a paint stand. That box will get installed later.
Categories:
tiny house
Thursday, June 14, 2018
Just When Things are Ticking Along... (Interior Walls 8)
... I get completely bogged down. I chose to use a board with a dramatic curve in it for the next row up on the north wall. My thinking was that, since it would mostly be hidden in the closet, it might be a good place to use it. Wrong-headed thinking! It looks okay installed now, but what a long, slow, nightmare getting it up there.
This top board is the one that gave me such fits. The notches I carved out of the top of it had nothing to do with its curvature; those were necessary in order to be able to lift it high enough to get the notch of the board engaged on the next row down without getting it hung up on the underside of the loft joists.
When I moved on to finishing up the last few boards in the east-end bumpout, I became even more bogged down! I spent an entire day on one board. I made four messes like the one below before I finally had the board done.
I wish I could declare this bumpout completely done but, of course, there is still a lot of trim to be installed at some point.
These are the last two wall boards in the bumpout up under the ceiling.
The view from the floor--looking up.
Once I finished with the bumpout, I immediately filled it up with stuff...
... so I could free up space in the south side of the bed alcove. This wall is next!
Also see:
Interior Walls 1
Interior Walls 2
Interior Walls 3
Interior Walls 4
Interior Walls 5
Interior Walls 6
Interior Walls 7
Interior Walls 9
Interior Walls 10
Interior Walls 11
Interior Walls 12
Interior Walls 13
Interior Walls 14
Interior Walls 15
The eagles were calling all day today. At one point, it occurred to me that someone was continuously calling right overhead. When I opened the JayBee door and looked up, this is what I saw.
Can't see it? It's right here. (To my eye, it seemed clearly obvious. To the camera, not so much.)
Categories:
paint/stain/colors,
tiny house,
walls,
wildlife
Monday, June 11, 2018
Interior Walls 7
More boards installed on the north wall...
Progress in the bathroom...
A stack of boards finished and ready for the east wall.
The boards will go around this corner.
Installed.
The first ceiling boards installed! This is inside the east-end bumpout. It's only three boards, but it's a start.
Also see:
Interior Walls 1
Interior Walls 2
Interior Walls 3
Interior Walls 4
Interior Walls 5
Interior Walls 6
Interior Walls 8
Interior Walls 9
Interior Walls 10
Interior Walls 11
Interior Walls 12
Interior Walls 13
Interior Walls 14
Interior Walls 15
Irises out in front of the JayBee.
Categories:
bathroom,
ceiling,
plant life,
tiny house,
walls
Monday, June 4, 2018
Interior Walls 6
The bathroom wall boards are now up to the height where they wrap around the vent pipe.
I made a lot of progress on the east end (bed area) bumpout.
Also see:
Interior Walls 1
Interior Walls 2
Interior Walls 3
Interior Walls 4
Interior Walls 5
Interior Walls 7
Interior Walls 8
Interior Walls 9
Interior Walls 10
Interior Walls 11
Interior Walls 12
Interior Walls 13
Interior Walls 14
Interior Walls 15
Irises on the hillside behind the JayBee.
On one of my many trips between the JayBee and my saws to cut boards, I spotted these two deer. (I know--kind of looks like only one deer. The fact that there were more than four legs was a clue.) They froze, staring at me, and I froze staring at them. I had my phone in my hand, so I was able to snap this shot before they darted away. (And, yes, there were two.)
Categories:
bathroom,
bed,
paint/stain/colors,
tiny house,
walls,
wildlife
Subscribe to:
Comments (Atom)


