Monday, August 3, 2015

Wall for Pocket Door

I switched my energy from installing shingles on the outside of the JayBee to installing interior walls inside the JayBee. The house needed interior walls if electrical wires were going to be run...

I started with the wall that will hold the pocket door that separates the kitchen and the bathroom. Here are the beginning pieces.


Normally, I would build the entire wall, then lift it and install it. Pretty quickly it became obvious that I would not be able to build the entire wall before installing it. There was just not enough maneuvering room inside the JayBee to do that.


First, I installed the 2x4 footer across the whole width of the JayBee. Even though the 2x4 should not be in the doorway, this helped me ensure that the wall was all in the same plane. Then I installed all the pre-assembled door-opening pieces. Then, I installed the stud on the far left, and installed the top plate.
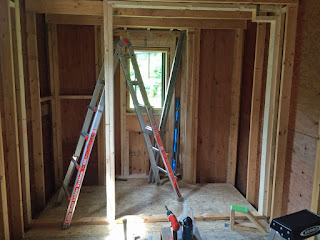

I had made cuts up from the bottom of the footer before installing it, so cutting out the doorway part was easy to do it after the wall was done.


I cut the footer out from the doorway and installed the hardware on the header that will carry the pocket door.


The right/north side of the wall looks a bit strange. Normally, there would be a double stud that would extend from the end of the door hardware up in the header straight down to the floor. However, that double stud would directly bisect the space I plan to use to access the hot water heater from the bathroom side of the wall. Instead, I built a reinforced stud up at the top of the wall and then a strange-shaped piece for the middle of the wall that will serve as a door stop. This photo also shows the metal half-studs (leaning up against the wall of the bumpout) that I have not yet installed in this wall. They will go in after the shower stall is in place--or at least on the bathroom side of this wall. Once the half-studs are installed, the pocket door can be hung in the wall.


Sleeping Here and There. AKA George Gallery

Yes, everyone, I am very far behind with posting. I have been taking photos, and I have now organized them enough to post.

I'm starting with a sampling of George photos.


This next shot is not of viciousness. George is yawning...


...before conking out again.


Saturday, July 25, 2015

Oh, Joy. The Permitting Process.

I have a building permit! I am proudly displaying it inside the JayBee.


Why is this so momentous?

When I began building the JayBee back in 2011, my plan was that the house would be a place to live temporarily while I tore down my existing wreck of a home and built something to replace it. I got a permit for an Individual Private Campsite that would have allowed me to do just that. With that permit, all that would have to pass inspection were the water and septic hookups. Unbeknownst to me at the time, I would only be allowed to live in the JayBee for 120 days out of the year. (Can you imagine me building an entire house in 4 months? Yeah, well, me neither.)

Over the intervening years, several things have changed. I fell more in love with the JayBee and decided that I want it to be my permanent home. I would rather completely downsize now and not build another home after this one. The contractor I found to do the site work was concerned that the current location of the JayBee would make hooking up to the septic system difficult because it would be hard to achieve the proper slope with the waste line. Since I want the JayBee to be my permanent home, he suggested that I tear down the current house, build a proper pad in its place, and move the JayBee onto the pad--thus positioning the JayBee where the current house stands. What a great idea! It makes it possible to put a better foundation under the JayBee, makes all of the connections to utilities easier/better, and puts the house closer to the river view.

Having read a lot of stories about the code obstacles tiny-house folks have encountered in communities all across the country, I dreaded going to city hall to pursue getting a real building permit. My initial meeting with the code enforcement officer (CEO) went better than I had anticipated. It turns out that my city has a minimum house size of 80 square feet; since the JayBee is 238 square feet, the total building size is not a problem. After I submitted my permit applications (I also had to submit an application for a Shoreland Zone permit), the CEO presented some issues I had to address. She would not accept the gravel pad my contractor had designed as the JayBee's foundation, even though that is perfectly acceptable for mobile homes, because the JayBee is not being built by a certified, approved mobile home manufacturer. I have resolved that objection by agreeing to have a cement slab foundation constructed instead. The CEO also objected to my planned R40 ceiling insulation, noting that the code requires R49. I found a subsection in the code that allows a cathedral ceiling (with no attic space) that cannot accommodate enough insulation to achieve R49--in other words, the JayBee ceiling--to go as low as R30. That issue is resolved as well. I had no issues with being in a shoreland because I am not removing any vegetation with this project, the proposed house will not be any closer to the river than the house I am removing, and the total square footage of buildings on my property will be lower once the houses are swapped out.

So, I now have three permits: a building permit, a shoreland zone permit, and a demolition permit. I imagine there may be other code-related issues that arise as the inspections/approvals occur but, for now, this feels like a big step forward.

---

On a completely different note, I have become obsessed with the hordes of snakes that are living in my yard. At any given time, I can find at least three snakes out in the open, and I find myself checking multiple times a day.

Here's one.


George was curious and followed this one, but stayed a respectful distance away, a far cry from what he would have done years ago--kill it and proudly bring it to me.


Here's another one.


And another.


These aren't itsy bitsy garter snakes; they're two-foot-long creatures that scare the wits out of me.

There is also a bird that has been hanging out with me lately. (See her sitting on the sign in the photo below.) She has become way too cavalier about hopping around on the ground and things that are close to the ground, given that there are two cats living here. Granted, neither of my cats act like master hunters now that they are older, but they would not hesitate to grab easy prey either.


A few mornings ago, I just had to capture the sparkles on the water...and the cormorant on the buoy.


Tuesday, July 21, 2015

Siding (West Wall) 3

I've been slogging through the humidity, and slowly making progress with siding the west end. Two more rows and I was up to the window.


Another row...


...and another two. Caught both cats in this photo. George is out!


Also see:
Siding (West Wall) 1
Siding (West Wall) 2
Siding (West Wall) 4
Siding (West Wall) 5
Siding (West Wall) 6
Siding (West Wall) 7
Siding (West Wall) 8
Siding (West Wall) 9
Siding (West Wall) 10


Yesterday, I did finally go swimming in the river at the end of the day. After sweating all day in the humidity, the cool water felt great!


I invited both cats to join me at the river. Bear was eager, but George was all "ho hum, I'm not goin' anywhere."


Then, when Bear and I got back to the house, George ran over like he was thinking "Hey, where'd you guys go? What did I miss?"


Today when I was up on a ladder, guess what Bear was thinking?!


He paced back and forth, chatting and complaining, but he didn't climb the ladder--this time.


Sunday, July 19, 2015

Siding (West Wall) 2

More progress with siding the west end.


I was trying to hurry at the end of today so I could go swimming. By the time I was wrapping up, though, there were loud thunder claps nearby. I guess it's not such a good idea to go swimming.

Also see:
Siding (West Wall) 1
Siding (West Wall) 3
Siding (West Wall) 4
Siding (West Wall) 5
Siding (West Wall) 6
Siding (West Wall) 7
Siding (West Wall) 8
Siding (West Wall) 9
Siding (West Wall) 10

I'm Done Staining Shingles!

Here is the last batch of stained shingles! 24 bundles, approximately 125 shingles per bundle--that's about 3,000 shingles that I sanded and stained, all six sides of each one. This is the first time in many months that my living room floor is no longer covered in plastic and drying shingles.


The inside of the JayBee is Arlen's workshop these days. Here are his bed's footboard and headboard in process.


Friday, July 17, 2015

Siding (West Wall) 1

Before I began to install shingles on the west end of the JayBee, I installed this piece of trim. Can you guess why it's there? (Answer below.)


The starter course installed.


After I had half of the first official course of shingles installed...


I realized I had forgotten to put flashing on the outer corners of the bumpout. Oops! I went ahead and installed it at this point.


After I finished installing the first row, half of my mistake was hidden.


After the second row was done, my mistake was completely hidden.


[Answer: The trim at the bottom of the west end is where the JayBee's license plate will hang if/when it travels down the road.]

Also see:
Siding (West Wall) 2
Siding (West Wall) 3
Siding (West Wall) 4
Siding (West Wall) 5
Siding (West Wall) 6
Siding (West Wall) 7
Siding (West Wall) 8
Siding (West Wall) 9
Siding (West Wall) 10


Summertime low tide on the river.