
I started with the wall that will hold the pocket door that separates the kitchen and the bathroom. Here are the beginning pieces.

Normally, I would build the entire wall, then lift it and install it. Pretty quickly it became obvious that I would not be able to build the entire wall before installing it. There was just not enough maneuvering room inside the JayBee to do that.

First, I installed the 2x4 footer across the whole width of the JayBee. Even though the 2x4 should not be in the doorway, this helped me ensure that the wall was all in the same plane. Then I installed all the pre-assembled door-opening pieces. Then, I installed the stud on the far left, and installed the top plate.
I had made cuts up from the bottom of the footer before installing it, so cutting out the doorway part was easy to do it after the wall was done.

I cut the footer out from the doorway and installed the hardware on the header that will carry the pocket door.

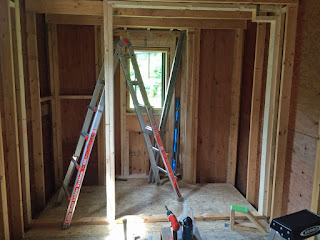
The right/north side of the wall looks a bit strange. Normally, there would be a double stud that would extend from the end of the door hardware up in the header straight down to the floor. However, that double stud would directly bisect the space I plan to use to access the hot water heater from the bathroom side of the wall. Instead, I built a reinforced stud up at the top of the wall and then a strange-shaped piece for the middle of the wall that will serve as a door stop. This photo also shows the metal half-studs (leaning up against the wall of the bumpout) that I have not yet installed in this wall. They will go in after the shower stall is in place--or at least on the bathroom side of this wall. Once the half-studs are installed, the pocket door can be hung in the wall.

Normally, I would build the entire wall, then lift it and install it. Pretty quickly it became obvious that I would not be able to build the entire wall before installing it. There was just not enough maneuvering room inside the JayBee to do that.

First, I installed the 2x4 footer across the whole width of the JayBee. Even though the 2x4 should not be in the doorway, this helped me ensure that the wall was all in the same plane. Then I installed all the pre-assembled door-opening pieces. Then, I installed the stud on the far left, and installed the top plate.

I had made cuts up from the bottom of the footer before installing it, so cutting out the doorway part was easy to do it after the wall was done.

I cut the footer out from the doorway and installed the hardware on the header that will carry the pocket door.

The right/north side of the wall looks a bit strange. Normally, there would be a double stud that would extend from the end of the door hardware up in the header straight down to the floor. However, that double stud would directly bisect the space I plan to use to access the hot water heater from the bathroom side of the wall. Instead, I built a reinforced stud up at the top of the wall and then a strange-shaped piece for the middle of the wall that will serve as a door stop. This photo also shows the metal half-studs (leaning up against the wall of the bumpout) that I have not yet installed in this wall. They will go in after the shower stall is in place--or at least on the bathroom side of this wall. Once the half-studs are installed, the pocket door can be hung in the wall.

No comments:
Post a Comment