Showing posts with label kitchen. Show all posts

Saturday, December 18, 2021

Plumbing! (AKA Plumbing 3)

As long as I've been working on this project--yes, many years--I have found it nearly impossible to hire trades people to do the plumbing and wiring on the JayBee. (Maine has a lack of people working in the trades and the ones we do have are booked solid for many months in advance with way bigger projects than mine.) Luck has been with me this year, thank goodness. Not sure why, since all the trades are more tightly booked this year than ever--even going out to 2023 in some cases. I'm just embracing the luck, though, and counting my blessings.

In mid November, I heard a rumor from some neighbors that a former state plumbing inspector lives nearby, is now retired, and takes on occasional plumbing jobs. When I called him, it turned out he had been the state plumbing inspector when I reported the plumber-thief years ago. I recognized his name, and he recognized my name and the case; that's small-town Maine for you! He was skeptical about working on a tiny house, but he agreed to stop by and see my project. After seeing it, he agreed to finish up my plumbing!

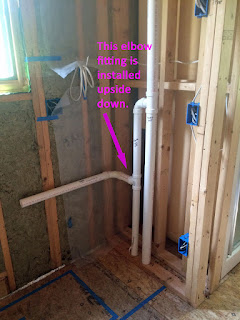
My new plumber wanted to change four things about the plumbing that had already been done. First, he pointed out that an elbow installed on the kitchen-sink drain line had been installed upside down. Note how it curves upwards instead of down. Makes me shake my head. That's why I hired out the plumbing--so it would be done right. I had not noticed this mistake.


Next, he didn't like that the drain line for the washer was going to put the p trap under the floor--making it susceptible to freezing. Third, we debated how to vent the washer. I didn't want another hole in the roof for a separate vent, and I didn't want a bunch of vent line cluttering up the loft as it snaked across to tie into the bathroom vent. The Code Enforcement Officer agreed that we could use an air activation valve on the washer--as long as it would be accessible in case it needed to be serviced down the road. Finally, the plumber didn't like that the water line to the outdoor faucet did not have its own shut-off valve.


The plumber was very excited after his first full day of work, so I stopped by after my work day to check it out. When I drove up, I saw a lot of plumbing supplies lying on the slab, but I didn't see that much work had been done.


When I got down on my knees, though, and looked up on the underside of the JayBee's floor, my jaw dropped. Even though I was fully aware of every plumbing fixture in the house, I just didn't envision how much piping was going to be required underneath the house. I'm sure glad I didn't try to figure out this maze by myself!


On subsequent days, the plumber fixed the drain line to the kitchen sink.


He ran water lines to the bathroom sink and toilet.


He ran water lines in and out of the water heater, and over to the washer. He also brought the water line up through the floor (missing the support beam for the trailer underneath) and over to the water heater.


Now the washer's p trap is above the floor (in the conditioned space), and the outdoor faucet has its own shut-off valve.


The washer is vented up the wall of the closet and is capped by an air activation valve (on top of the vent pipe).


The last bit the plumber did was wrap the water line under the house with heat tape and insulation.


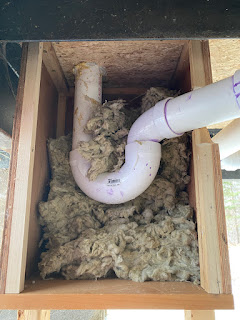
There was no way not to have the p trap for the shower underneath the house, so I built a box around it to insulate it.


I loaded the box with insulation...


After I finished adding insulation to the box, I screwed its last side onto it.


The only plumbing things left to do are: connect the two sinks, install the toilet (flooring has to go down first), and turn the water on. I don't want to turn on the water until all the electrical boxes are live and functional, the house has functional heat, and I have the skirting installed around the outside of the house. I have my work cut out for me!

Also see:

Plumbing 1
Plumbing 2


One additional thing I've done recently: I hung this heater in the bathroom. It's installed higher on the wall than recommended--but it's the only place it would fit in the bathroom. I have an identical heater that will be installed in the living room--down at the height that it belongs. The two heaters, along with the electric radiant heat in the floor, should keep the JayBee nice and toasty!


Monday, April 3, 2017

Progress Amidst the Snow (also Entry/Office Cupboard 4)

And the snow keeps on coming!

This was Saturday. Snowed all day. [To you-know-who who plans to leave Hawaii and return to Maine this month: Are you sure you want to come back to this?]


Even with the snow, I kept busy with JayBee projects. I have these stainless steel racks I'm going to use to help me store plates. I decided I didn't want them to be shiny.


So I applied oil-rubbed bronze paint to them.


Remember this cabinet?


I was worried I was going to ruin it as I moved around the JayBee installing insulation, so I took it inside the house. I drilled a couple of extra holes for cables, and I started painting.


The beadboard in the back of the cabinet is now painted barn red. I love milk paint and no-VOC finish!


Most of the new snow melted on Sunday. It may not be easy to see all of the ducks that are out on the river in this shot...


All of those white dots stretched out in a line are ducks.


Thursday, August 28, 2014

Pantry Cabinet 8

After much experimentation, I decided I will paint the JayBee's kitchen cabinets a light green color. I am mixing a custom color of milk paint, and I have mixed it to be thinner than paint but thicker than a wash--so the wood grain bleeds through a little. I started by painting all the adjustable shelves that sit in the back of the pantry cabinet, and then adding three coats of poly whey. Here is one of the shelves.


See how well the color coordinates with the tiles I will use as a backsplash over the kitchen counter and stove?


I next focused on the insides of the doors because I was anticipating a houseful of company--and I needed a place to get my spices put away. (They had all been sitting on my kitchen table since I brought the pantry cabinet into my house and displaced my spice cabinet.)


In addition to applying all the coats of paint and poly whey, I cut shelf liners to fit each of the various shelves.

I got the insides of the doors done before company arrived--so the spices have a home. Painting the rest of the cabinet will wait for future rainy days.


Also see:
Pantry Cabinet 1
Pantry Cabinet 2
Pantry Cabinet 3
Pantry Cabinet 4
Pantry Cabinet 5
Pantry Cabinet 6
Pantry Cabinet 7
Pantry Cabinet 9

Wednesday, July 30, 2014

Pantry Cabinet 7

I have now installed door handles on the pantry cabinet. I haven't decided on a closing mechanism. Magnets? Latches? Don't know yet.


I purchased some sample milk paint colors and I have started experimenting.


The milk paints have no VOCs and clean up with water. I have also purchased a non-toxic poly whey finish; I'm experimenting with that as well.

Also see:
Pantry Cabinet 1
Pantry Cabinet 2
Pantry Cabinet 3
Pantry Cabinet 4
Pantry Cabinet 5
Pantry Cabinet 6
Pantry Cabinet 8
Pantry Cabinet 9

Sunday, July 6, 2014

Pantry Cabinet 6

The right door being installed...


The left door being installed...


The finished cabinet (with the adjustable shelves that sit in the back of the cabinet not installed at the moment)...


I was going to leave the cabinet with no finish (and no door handles) on it for now because I have not decided if I will be painting or staining the kitchen cabinets in the JayBee, and I have not yet decided on a cabinet-handle style...but...I have moved the cabinet into my regular house (so I don't ruin it and have it in the way out in the JayBee) but I am worried that I will ruin it anyway if it has no finish on it. So, I have a decision to make. If I put a finish and some door handles on it, I could start using it...

Also see:

Friday, July 4, 2014

Pantry Cabinet 5

Here is the left cabinet door, with the shelves attached to its inside:


Below, both doors are complete and sitting inside the cabinet. The small cracks along the outside edges are for the piano hinges.


In the photo below, the piano hinges have been installed on the door edges (36 screws down each side!), but not yet attached to the inside of the cabinet.


Also see:
Pretending It's Spring (Pantry Cabinet 1)
Pantry Cabinet 2
Pantry Cabinet 3
Pantry Cabinet 4
Pantry Cabinet 6
Pantry Cabinet 7
Pantry Cabinet 8
Pantry Cabinet 9


Standoff at the door to the JayBee:


Détente:


George covered in Bear's fur:


George helpin':


Thursday, July 3, 2014

Pantry Cabinet 4

Assembled cabinet base standing up after all screw holes have been plugged:


I propped the door frames in the cabinet opening to figure out how everything will fit, including the piano hinges.


Below is the base cabinet with adjustable shelves inserted. Miracles do happen; all those peg holes I drilled actually line up.


Below are the door shelf units set into the cabinet the way they will sit when they are installed on the backs of the doors. I purposely left space between them so each shelf unit could swing out without hitting the other shelf unit. Now that I see everything set into place, I think this will work with the left shelf unit (the shallower side); it looks like the the right shelf unit probably won't swing out unless the left door is opened as well.


Here are the shelf units propped as they should look when the cabinet doors are open. (The right shelf unit is sitting on the floor instead of being propped up to its proper height because the JayBee's ceiling joist was in the way.)


Next up: attaching the doors to the shelf units, and installing the piano hinges.

Also see:
Pretending It's Spring (Pantry Cabinet 1)
Pantry Cabinet 2
Pantry Cabinet 3
Pantry Cabinet 5
Pantry Cabinet 6
Pantry Cabinet 7
Pantry Cabinet 8
Pantry Cabinet 9


Bear likes to get in the middle of things...and he leaves everything I work on covered with fur, thank you very much.


At 6:30 this morning, there was a quick series of loud cracks and a thump. A huge willow tree just fell over! It missed both the garage and the JayBee, thankfully, but the problem isn't over. The huge branches are propped upright on my septic field. (They look like trees standing there!) They need to be cleared away, but I think they pose a hazard to anyone who gets close. Hopefully any birds, squirrels, chipmunks, etc., that were living in the tree are okay. Oh, and I don't need high winds here anytime soon.


That big patch of sky on the left used to be filled with the willow tree and its foliage.