Showing posts with label vapor barrier. Show all posts

Friday, August 25, 2017

Vapor Barrier & Radiant Barrier

When I had made the decision to install a fan in the bathroom, I left the vapor barrier open by the awning window in the gable peak above the bathroom, thinking that the vent for the fan might go there. But no, of course not. When I opened the fan I purchased and read the installation directions, it became clear that the fan had to be vented under the eave on the north wall--a wall I had already sealed up with the vapor barrier. Of course, because that is how this project (and my life) work.

Now, though, I have finally finished installing the vapor barrier on the walls of the bathroom.


Next up: Installing the radiant barrier on the ceiling.

For those who haven't been following along for years, I am using radiant barriers on all surfaces of the JayBee. A radiant barrier adds an extra 30% to the R-value of the insulation in a surface. The radiant barrier I installed on the walls is on the exterior underneath the housewrap. Since it is perforated and not a vapor barrier, I installed plastic on the interior as the vapor barrier. The radiant barrier I used under the subfloor and that I am installing on the ceiling is a bubble-wrap type that doubles as a vapor barrier.

I started with the easy stuff--the ceiling of the bathroom bumpout...


..and the ceiling of the bed alcove bumpout.


To prepare the radiant barrier for the ceiling, I cut long strips, and added a little extra to make each piece large enough to cover half of the ceiling.
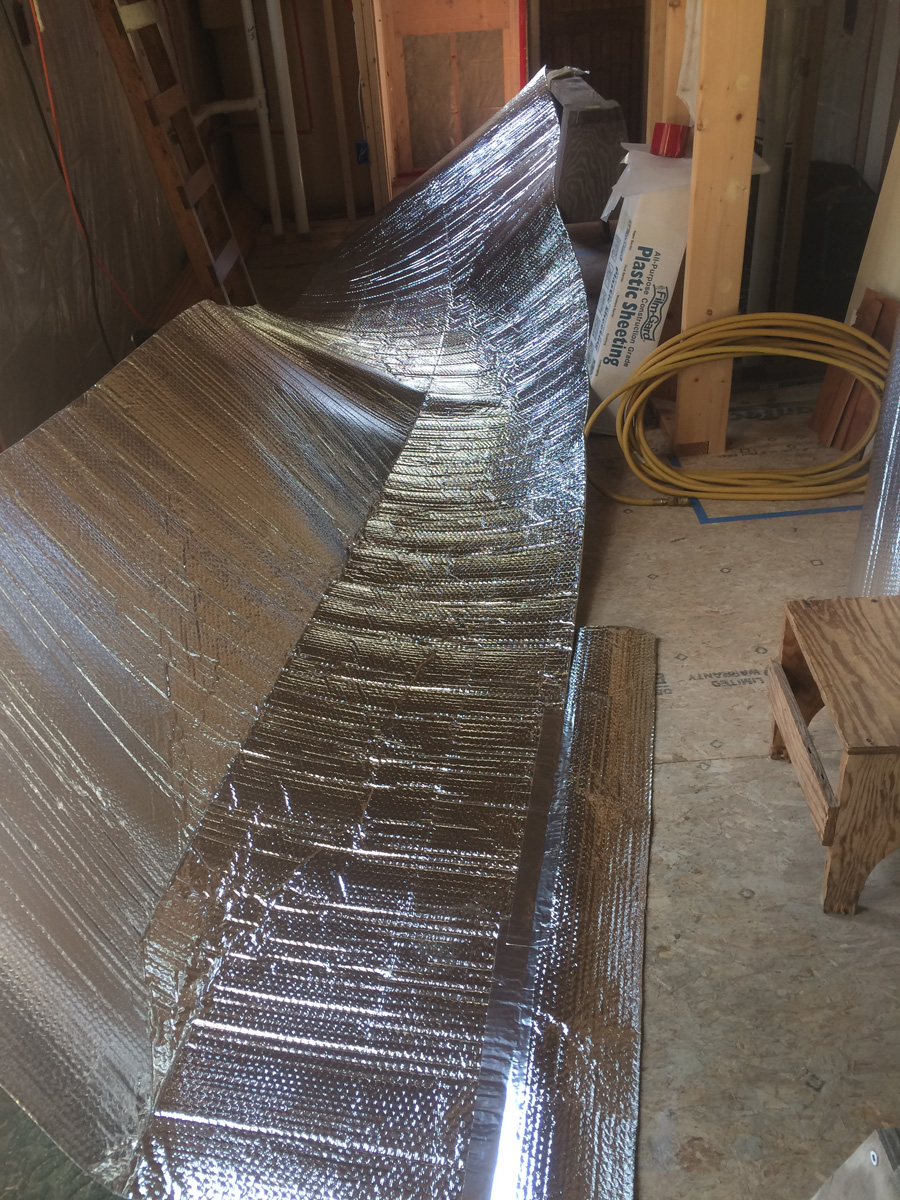

Beginning to install the radiant barrier over the bed alcove and reading-nook/guest-room loft.


Preparing a strip of the radiant barrier is pretty easy. Stapling the radiant barrier to the rafters is not very hard either. Covering every staple with tape, and sealing the radiant barrier to the plastic on the walls with tape--very time consuming.

I think installing the ceiling boards over this radiant barrier is going to be challenging. I like being able to see through the plastic on the walls--to see where all the framing is. Anticipating not being able to see through the radiant barrier while installing boards on the ceiling... hmm. We'll see how it goes.

Thursday, August 24, 2017

Dryer Vent

All the time I spent thinking about the bathroom vent brought me to think about the dryer vent as well.

I had installed the dryer vent very early on--well before installing the shingles on the north wall of the JayBee.


I installed it low on the wall, even though the dryer will sit on top of the washer in the house, because no appliance lasts forever and a possible future washer/dryer combo unit could still use this vent without having to blow upwards to vent. With my current washer and dryer stacked, though, it will require snaking duct hose down the wall from the dryer to the vent lower down the wall.

Here is the wall with the dryer vent, all insulated and protected with the vapor barrier.


The more I thought about it, the more I thought that the dryer vent wasn't quite right. If an elbow and round duct was installed on the inside of this wall, the washer and dryer would be pushed out from the wall by more than four inches. Too much real estate inside the house wasted.

I briefly considered buying specialized duct that is flattened rather than round and takes up less room, but I was worried that it would encourage the buildup of lint. (I know I should regularly clean all lint out of the dryer vent, but I rarely actually do so.) So, I am sticking with round dryer duct.

I decided I had to build a channel inside the wall so that part of the diameter of the duct can run inside the wall.

<sigh> I opened up the finished vapor barrier...


...and pulled out the insulation--at least the insulation in front of the wires. Hmm, there certainly are a lot of wires in this wall.


All those wires take up so much room in the wall that I can't push the dryer duct as far into the wall as I was hoping to. Nevertheless, I trimmed the vent stack to be shorter, and I built this channel.


I primed the channel and covered the back side of it with plastic--so the vapor barrier will end up being uninterrupted across this wall. I installed the channel in the wall, and I installed one of the elbows in the vent.


I insulated well behind the channel and insulated the rest of the wall cavity.


Then, I restored the vapor barrier.


Without extending the duct or installing it, I propped the duct and upper elbow in the channel to get a rough idea of how this will work.


While it looks like all this work and the special channel will only save about an inch of space, once the tongue-and-groove boards are installed on the wall, it will save close to two inches. I'm pleased with the results.

Tuesday, August 22, 2017

Bathroom Fan & Vent

Oh, my goodness--what a  l o n g  day! What I thought was going to be a relatively simple project ended up giving me fits and taking all day long to finish.

I had finished insulating this bathroom wall and installing the vapor barrier--but, I finally decided I should have a fan in the bathroom. So, I had to tear into what was already done.


The light is going to go here. (I didn't have to install the trim here that I installed on ceiling joists elsewhere in the house because the bathroom is going to have a ceiling installed on the bottom of these joists.)


The bathroom fan will be installed closer to the wall behind the light, on the other side of the ceiling joist.


I peeled back the vapor barrier and pulled out the insulation in the top part of this bay.


Then I drilled a hole all the way through the wall. It was well worth buying a three-inch hole saw to do this. I can't imagine how long I would have taken on this step without that specialized tool.


Here is the vent I planned to install.


I had read in reviews that it was a great little vent but that it didn't stop bees and hornets from nesting in it, so I added a piece of screen inside it.


I had to pound and pound and pound on the vent to get it installed in the wall. The hole was three inches in diameter, and so was the vent pipe, so it was a very snug fit. (Of course it would have been much better to have drilled a hole slightly larger than the vent, but I had purchased the largest hole saw available at the store I visited.)

I had started the four screws before pounding so I could keep the wedge pieces behind the vent aligned correctly. I cut the wedge pieces to give the vent a solid surface in one plane to butt up against, instead of trying to snug the vent up against the uneven shingles. The screws were loose, of course, and they kept falling out as I pounded--and getting lost in the foliage below.

Eventually, all the pounding split the wedge pieces. Aargh!

I had to hand screw at least the upper two screws because they were up under the overhanging eave, but the only screwdriver handle I had that was short enough to fit has lost something (magnetism? a ball bearing?)--whatever should hold in the screw bit, so the screw bit kept falling out and getting lost in the foliage below.

What a never-ending pain in the ...


Finally, it was installed.


I cut a short piece of duct and installed that on the vent. This duct will expand/telescope, so it is more than long enough to reach the fan once it is installed.


Then I re-installed the insulation...


...and the vapor barrier.


I am going to wait until later to install the fan so I have more maneuverability in this space for now. I will also have to drill a hole in the joist so the fan can draw power from the light fixture. The light and the fan will be controlled by the same switch.

Phew! Long day, but the bathroom wall is back to being done.

Monday, July 31, 2017

Vapor Barrier 2

More progress...


Many more hours of podcasts devoured in the process--This American Life, Ear Hustle, and SKS--Someone Knows Something.

Also see:
Vapor Barrier 1

Wednesday, July 26, 2017

Vapor Barrier 1

Glorious days! A rainy day--which is fine now that I'm working on the inside of the JayBee. Nice, sunny days--but much cooler than the hot, humid stuff we'd been having. I took full advantage of these cooler days and plugged along with installing the vapor barrier on the interior walls. It is slow going but much more fun than insulating, so I'm able to stick with it for longer. For some reason, playing music wasn't motivating me, so I binge-listened to some podcasts (Dear Sugar Radio and Modern Love) and kept moving.


Also see:
Vapor Barrier 2

Saturday, June 25, 2016

Insulation & Vapor Barrier--Walls & Ceiling--2

More progress. The base and insulation for under the shower stall.


Bracing installed around the inside of the shower-stall bay--to support the sides of the shower stall and the grab bar I plan to put in the shower stall.


The shower stall slid back into place. Not installed yet, though; plumbing has to come first!


Some more baffles...


...and ceiling insulation.


Also see:
Insulation & Vapor Barrier 1
Insulation & Vapor Barrier 3


Sometimes George picks the weirdest places to sleep.


Friday, June 24, 2016

Insulation & Vapor Barrier--Walls & Ceiling--1

Before installing insulation, I used spray foam to plug the holes in the backs of the electrical boxes that would otherwise be holes in the eventual vapor barrier. The orange color indicates that this foam is fire blocking foam as well.


In order to keep the air moving from the ventilation holes in the eaves up to the ventilation holes next to the ridge board...


...I'm installing baffles to keep the insulation from plugging up the air flow.


Working in the JayBee seems to constantly involve cramming myself into tight spaces. I hit my elbow's funny bone three times while working in the shower stall.


Mess and chaos.


Insulation installed behind the shower stall...


...and up to the peak.


Then the vapor barrier installed behind the shower stall.


And all the edges taped.


Also see:
Insulation & Vapor Barrier 2
Insulation & Vapor Barrier 3