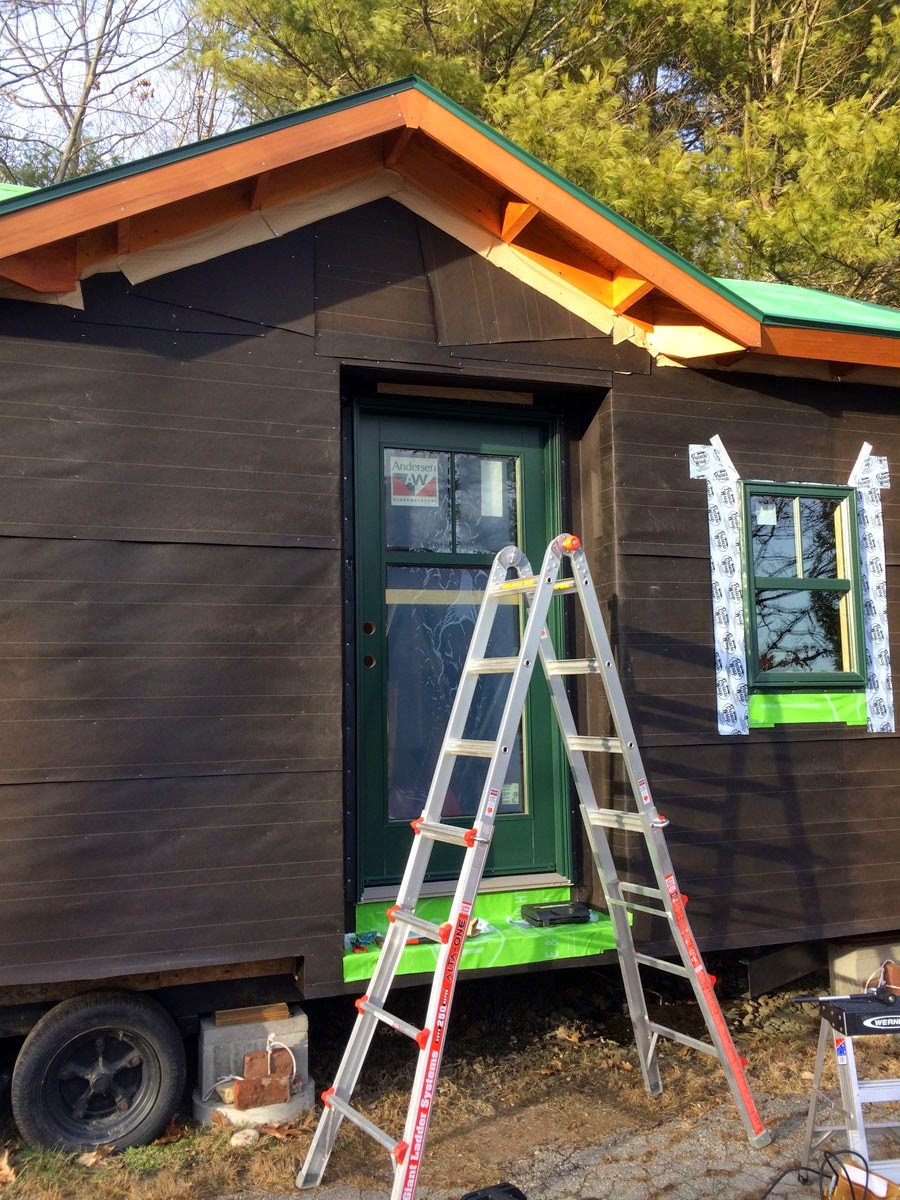
I guess we're going to get a whopper doozy blizzard starting tonight. I've been scrambling to cut trim pieces for the JayBee so I can assemble window trim indoors while the storm rages outside.
First window trim installed!
The photo below shows that the windowsill slopes downward slightly so it will shed water. The bottom trim piece has a slot cut out of the back of it so siding shingles can be slid up behind it.
Also see:
Window Trim 2
Window Trim 3
Window Trim 4
Window Trim 5
Window Trim 6
Window Trim 7
Window Trim 8
Window Trim 9
Check this out (below). Early in the day, there were small icicles hanging from the ends of the dormer valleys. When one of them fell off the roof, it landed vertically on the pavement and stayed that way for hours.
When I was up on a ladder a couple of days ago, Bear climbed up the other side of the ladder. Of course there was nowhere for him to go once he got up there, so he started dancing in circles. When he slipped and began to fall off the ladder, he grabbed ahold of my thigh. Yee OW!
Monday, January 26, 2015
Friday, January 23, 2015
Some Days (Okay, Maybe Even Weeks) are Filled with Problems
Some time ago, I mentioned that I'd had a couple of bad days, days during which many things went wrong. It happens occasionally, but this really was an exceptional streak.
The first window I installed in the JayBee was broken. It could have been damaged during shipping. I unpacked the windows in the dark the day they arrived, so I wasn't super thorough with checking the windows over before storing them. When I noticed the window was broken before I installed it, I should have loaded it into my car and taken it to a glass-repair place, and then worked on installing a different window. But, no, I installed it anyway. As soon as I had the window installed, I knew I could not live with it broken. There is no way to know how long it would have taken for the window to become compromised but, eventually, moisture would have made its way between the panes and clouded it up. A few days later, I had a glass repair person come to the house to assess the window and work up an estimate for repairing it. I was surprised by how aggressive this guy was with the window. He roughly yanked and pried the molding pieces off the window--so roughly, in fact, that I thought they might snap in the cold. When one of the molding pieces resisted removal, the repair person used a pry bar. He set the curve of the bar against the crack in the window; when he pried, the window pane broke some more!
This photo shows the original break (the long diagonal crack) and the additional breaks added by the repair person (the two additional cracks within the corner triangle).
When I called the glass place to accept the estimate and make arrangements to have the window repaired, they started second-guessing their assessment of the window and suggested they come back again to reassess it. (Specifically, they were now thinking the window was one big pane rather than separate panes.) You may be wondering why I didn't cut my losses at this point and find a different way to have the window fixed. I wondered this myself, but I agreed to the second assessment as long as I would not be charged for two trips to my home. This time, the manager of the repair place came. He did not remove any of the window molding. Instead, he took down information about the window and said he would talk to Andersen. After he had returned to his shop, he called me twice to ask me to take pictures of the broken window and various window stickers and tags. It was all worth it, though, because he convinced Andersen to replace the window (not the frame, just the pane) for free! (I only had to pay for the labor to swap out the window.) Today, the manager returned and replaced the window unit. Ta da! New, unbroken window.
As I work, I am meticulous about picking up any screws, nails, or staples that I drop. I don't typically drop many such things, but I don't want to leave anything on the ground that my car tires might pick up. Usually I know where a screw or staple has ended up, just by hearing it ping on its way down. Over the course of these few unlucky days, I was dropping way more screws and staples than usual, and I couldn't find them! I spent more time on my hands and knees on the cold ground scouring around for these dropped items. Then, after collecting these things and other small bits of trash in a plastic container for days, the wind tossed the container across the driveway, scattering everything far and wide.
After I installed the first window, I installed the JayBee door. When I removed the plastic film from the large glass panes in the door, I noticed that there is a long, 5-6 inch scratch in one of the panes. The glass is not broken, but the scratch is deep enough that it cannot be buffed out. Aargh!
After the door was installed all square, plumb, and level, I removed the bracing from the inside of the door and opened it. But, then, it would not close! In the photo below, notice that the door (on the left) has enough clearance to close up at the top of the jamb but then does not clear the jamb at the bottom of the photo. It was really close--the vinyl on the outside of the door cleared the jamb, but the wood on the inside did not.
The bottom corner of the door had the same issue--the door cleared the jamb in the corner, but the middle of the door did not. Since the other three sides of the door had very even, consistent clearance from the jamb all the way around, I figured I had two options for making the door close: either plane the wooden edge of the door to make it fit the jamb, or drive screws through the door jamb to create the clearance needed for the door. I was hesitant to do either of these things because the wood on this door and jamb is really nice and I hated to mar it. Finally, after many days of stewing, I decided on option two. I marked out spots to drill holes that would be consistently spaced and would miss all metal braces, the door knob, and the dead bolt. I started with the spot closest to the middle of the door. I drilled the hole, and drove a screw until I could tell the jamb was pulled over just a bit. The door closed! I ended up using seven screws--two of them can be seen in the photo below.
I adjusted the screws until the clearance between the door and the jamb was consistent along the door's entire edge. I haven't plugged the screw holes yet. I am going to wait and see if the door requires adjustment over time. If it goes through a few seasons without needing adjustment, I will plug the holes with dowel pegs. See the nice, consistent clearance the door has now?
The door came with pre-drilled holes for a door knob and a dead bolt, but the jamb had no holes for the latch and dead bolt and their strike plates. This next photo shows my beginning work on the hole and strike plate for the door latch.
Here is the fully installed door knob.
Here is the outside view of the fully installed dead bolt and door knob.
As if all of these JayBee-related problems weren't enough, I was experiencing similar snafus in the rest of my life as well. I had been feverishly working on finishing an afghan I had been crocheting as a gift for my brother. Finally, I was at the point of connecting all of the long crocheted strips to assemble the finished product. Then, while connecting the fifth strip... Oops! What's wrong with this picture?
The first window I installed in the JayBee was broken. It could have been damaged during shipping. I unpacked the windows in the dark the day they arrived, so I wasn't super thorough with checking the windows over before storing them. When I noticed the window was broken before I installed it, I should have loaded it into my car and taken it to a glass-repair place, and then worked on installing a different window. But, no, I installed it anyway. As soon as I had the window installed, I knew I could not live with it broken. There is no way to know how long it would have taken for the window to become compromised but, eventually, moisture would have made its way between the panes and clouded it up. A few days later, I had a glass repair person come to the house to assess the window and work up an estimate for repairing it. I was surprised by how aggressive this guy was with the window. He roughly yanked and pried the molding pieces off the window--so roughly, in fact, that I thought they might snap in the cold. When one of the molding pieces resisted removal, the repair person used a pry bar. He set the curve of the bar against the crack in the window; when he pried, the window pane broke some more!
This photo shows the original break (the long diagonal crack) and the additional breaks added by the repair person (the two additional cracks within the corner triangle).
When I called the glass place to accept the estimate and make arrangements to have the window repaired, they started second-guessing their assessment of the window and suggested they come back again to reassess it. (Specifically, they were now thinking the window was one big pane rather than separate panes.) You may be wondering why I didn't cut my losses at this point and find a different way to have the window fixed. I wondered this myself, but I agreed to the second assessment as long as I would not be charged for two trips to my home. This time, the manager of the repair place came. He did not remove any of the window molding. Instead, he took down information about the window and said he would talk to Andersen. After he had returned to his shop, he called me twice to ask me to take pictures of the broken window and various window stickers and tags. It was all worth it, though, because he convinced Andersen to replace the window (not the frame, just the pane) for free! (I only had to pay for the labor to swap out the window.) Today, the manager returned and replaced the window unit. Ta da! New, unbroken window.
As I work, I am meticulous about picking up any screws, nails, or staples that I drop. I don't typically drop many such things, but I don't want to leave anything on the ground that my car tires might pick up. Usually I know where a screw or staple has ended up, just by hearing it ping on its way down. Over the course of these few unlucky days, I was dropping way more screws and staples than usual, and I couldn't find them! I spent more time on my hands and knees on the cold ground scouring around for these dropped items. Then, after collecting these things and other small bits of trash in a plastic container for days, the wind tossed the container across the driveway, scattering everything far and wide.
After I installed the first window, I installed the JayBee door. When I removed the plastic film from the large glass panes in the door, I noticed that there is a long, 5-6 inch scratch in one of the panes. The glass is not broken, but the scratch is deep enough that it cannot be buffed out. Aargh!
After the door was installed all square, plumb, and level, I removed the bracing from the inside of the door and opened it. But, then, it would not close! In the photo below, notice that the door (on the left) has enough clearance to close up at the top of the jamb but then does not clear the jamb at the bottom of the photo. It was really close--the vinyl on the outside of the door cleared the jamb, but the wood on the inside did not.
The bottom corner of the door had the same issue--the door cleared the jamb in the corner, but the middle of the door did not. Since the other three sides of the door had very even, consistent clearance from the jamb all the way around, I figured I had two options for making the door close: either plane the wooden edge of the door to make it fit the jamb, or drive screws through the door jamb to create the clearance needed for the door. I was hesitant to do either of these things because the wood on this door and jamb is really nice and I hated to mar it. Finally, after many days of stewing, I decided on option two. I marked out spots to drill holes that would be consistently spaced and would miss all metal braces, the door knob, and the dead bolt. I started with the spot closest to the middle of the door. I drilled the hole, and drove a screw until I could tell the jamb was pulled over just a bit. The door closed! I ended up using seven screws--two of them can be seen in the photo below.
I adjusted the screws until the clearance between the door and the jamb was consistent along the door's entire edge. I haven't plugged the screw holes yet. I am going to wait and see if the door requires adjustment over time. If it goes through a few seasons without needing adjustment, I will plug the holes with dowel pegs. See the nice, consistent clearance the door has now?
The door came with pre-drilled holes for a door knob and a dead bolt, but the jamb had no holes for the latch and dead bolt and their strike plates. This next photo shows my beginning work on the hole and strike plate for the door latch.
Here is the fully installed door knob.
Here is the outside view of the fully installed dead bolt and door knob.
As if all of these JayBee-related problems weren't enough, I was experiencing similar snafus in the rest of my life as well. I had been feverishly working on finishing an afghan I had been crocheting as a gift for my brother. Finally, I was at the point of connecting all of the long crocheted strips to assemble the finished product. Then, while connecting the fifth strip... Oops! What's wrong with this picture?
Categories:
door,
duh,
tiny house,
windows
Thursday, January 22, 2015
Entryway 8
A number of people have contacted me to ask if everything is okay since I haven't posted in awhile. Everything is fine. During the near-zero and below-zero weather days, I worked on downsizing inside the old house. I got rid of a bunch more stuff--through Freecycle and trips to Goodwill. I opened up access to the fuse panel in the old house should the electrician call to say he is ready to implement the next step on the electrical system for the JayBee. (Haven't heard from him yet.) I also treated myself to some play time--catching up with friends and such.
When the weather turned more moderate, I did some work on the exterior of the entryway. Removed the tarp.
Added some flashing and re-installed the floorboards.
There was so much wind during last Sunday's torrential rain that every window in the JayBee was covered with drops afterwards--even with the large roof overhangs on all sides.
Installed a bunch of trim boards.
Up in the ceiling of the entryway...
Also see:
Entryway 1
Entryway 2
Entryway 3
Entryway 4
Entryway 5
Entryway 6
Entryway 7
Miscellaneous photos from the last few weeks. Snowy view out the JayBee's east end. I was trying (unsuccessfully) to capture the snowflakes as they fell.
Bright moon reflecting off the ice in the river.
The cats have been suffering from severe cabin fever. One night, when I went to figure out what was making all the thumping sounds in the bathtub, I found Bear in there. I guess he dances when he's behind the shower curtain; whenever I attempt to peek at him, he stops and acts all innocent. "Who, me? Oh nothing."
When the weather turned more moderate, I did some work on the exterior of the entryway. Removed the tarp.
Added some flashing and re-installed the floorboards.
There was so much wind during last Sunday's torrential rain that every window in the JayBee was covered with drops afterwards--even with the large roof overhangs on all sides.
Installed a bunch of trim boards.
Up in the ceiling of the entryway...
Entryway 1
Entryway 2
Entryway 3
Entryway 4
Entryway 5
Entryway 6
Entryway 7
Miscellaneous photos from the last few weeks. Snowy view out the JayBee's east end. I was trying (unsuccessfully) to capture the snowflakes as they fell.
Bright moon reflecting off the ice in the river.
The cats have been suffering from severe cabin fever. One night, when I went to figure out what was making all the thumping sounds in the bathtub, I found Bear in there. I guess he dances when he's behind the shower curtain; whenever I attempt to peek at him, he stops and acts all innocent. "Who, me? Oh nothing."
Categories:
cats,
door,
entry,
flashing,
kennebec river,
tiny house,
trim,
weather,
winter
Sunday, January 4, 2015
And the Next Day...
I guess I got the windows in just in time.
(I put up the tarp over the entryway so I would be able to work on the entryway without having to chip through ice and snow.)
Categories:
tiny house,
weather,
windows,
winter
Saturday, January 3, 2015
Windows 3
What a difference a day makes! After two straight days of things going wrong (I will still do a "mistakes/problems" post eventually), today things went right.
Yesterday I finished off two more window openings.
I covered the openings with plastic for the night to keep the frost off the sills and out of the house.
This morning I was back out there early, and created the opening for the window in the east end bumpout. It was frigid, frigid, frigid out there today. Dale came over and helped me get the window into the opening.
Once the window was safely held in place, we moved on to install the two additional windows on the south side.
Once those two were held in place, I created the opening for the window on the north side.
After Dale helped me get the north window in place, I worked at finishing the installation--screws, flashing, and housewrap tape. As the sun was setting and the snow was starting, I finished the north window...
and moved on to finishing the three other windows we had installed. I worked with a headlamp until 6:00 to finish. No pictures because it was pitch black out there. Snow was starting to collect on the ground when I finally quit for the day and headed for a bath. Great day!
Also see:
Windows 1
Windows 2
Windows 4
Last night's pink sky.
The river has been loud! The incoming tide takes the ice north and then the ice heads south when the tide turns and heads the other way--all the while scraping on the buoys. In the photo below, the red buoy can be seen between the two pine trees after it's been carried north by the ice. It is usually situated behind the pine tree in the center of the photo.
Yesterday I finished off two more window openings.
I covered the openings with plastic for the night to keep the frost off the sills and out of the house.
This morning I was back out there early, and created the opening for the window in the east end bumpout. It was frigid, frigid, frigid out there today. Dale came over and helped me get the window into the opening.
Once the window was safely held in place, we moved on to install the two additional windows on the south side.
Once those two were held in place, I created the opening for the window on the north side.
After Dale helped me get the north window in place, I worked at finishing the installation--screws, flashing, and housewrap tape. As the sun was setting and the snow was starting, I finished the north window...
and moved on to finishing the three other windows we had installed. I worked with a headlamp until 6:00 to finish. No pictures because it was pitch black out there. Snow was starting to collect on the ground when I finally quit for the day and headed for a bath. Great day!
Also see:
Windows 1
Windows 2
Windows 4
Last night's pink sky.
The river has been loud! The incoming tide takes the ice north and then the ice heads south when the tide turns and heads the other way--all the while scraping on the buoys. In the photo below, the red buoy can be seen between the two pine trees after it's been carried north by the ice. It is usually situated behind the pine tree in the center of the photo.
Categories:
flashing,
kennebec river,
tiny house,
weather,
windows
Thursday, January 1, 2015
New Year, New Door
Even though I have been working on this project for years, I still grossly underestimate how long things will take me. I thought I would get the door and a few windows installed in the JayBee today. But no. I barely got the door installed, and I'm still not done with it.
First, I took down the tarp over the entryway.
Then I worked on waterproofing the door sill. I installed a plastic door sill, only to remove it later when it became obvious it used too much space and the door would not fit in what was left of the rough opening.
Finally, Arlen and I were able to wrestle the door into place.
The door with its flashing in place. Notice the bracing is still on the inside of the door. I hope to remove that tomorrow when I finish the installation.
First, I took down the tarp over the entryway.
Then I worked on waterproofing the door sill. I installed a plastic door sill, only to remove it later when it became obvious it used too much space and the door would not fit in what was left of the rough opening.
Finally, Arlen and I were able to wrestle the door into place.
The door with its flashing in place. Notice the bracing is still on the inside of the door. I hope to remove that tomorrow when I finish the installation.
Categories:
door,
flashing,
tiny house
Subscribe to:
Posts (Atom)