Sunday, October 28, 2012

George

I was asked recently if George is okay--since I regularly post photos of Bear but rarely of George. (During the warm summer months, George's black fur heats up so quickly in sunlight that he hides away most of the time.) As luck would have it, both cats have been especially eager to go for walks these last few days...


George is quite fine. All spring and early summer I was a little worried about him. He didn't seem his usual self. He seemed to have totally conceded alpha-cat status to Bear and was letting Bear push him around. I wondered if he was feeling old and tired; he turned 13 in August. These last several weeks, though, he's been acting like his old self...


including not putting up with any of Bear's schenanigans.


This weekend, George must have been channeling Bear. He snoozed wherever he could bake in the sun...


...and he made a pest of himself--getting in the way as I was working on cutting small roof rafters.

Thursday, October 18, 2012

Entryway 7

A beautiful autumn day here! I spent the entire day on the entryway. Sometimes it's hard to believe how long things take me. Before I could install the cedar boards, I had to install narrow pieces of sheathing in back of the step and below the step. I decided the step was wide enough to need slightly more than two boards, so I found an extra cedar board and ripped a narrow strip to put in the back. After putting preservative on all three boards, I installed them.


Bear was the first to try out the new step.


I found a thin board I could set on the step to protect it from dirt and dings.


Finally, I installed sheathing around the top of the entryway. Working overhead in a tiny space is not an easy thing!


While many trees have completely shed their leaves, the leaves on the large oaks are just now beginning to change color.


Also see:
Entryway 1
Entryway 2
Entryway 3
Entryway 4
Entryway 5
Entryway 6
Entryway 8

Tuesday, October 9, 2012

Entryway 6

Over the course of several weeks, I've been working on the JayBee's entryway. The small holes I had drilled in the entryway floor for drainage proved to be too small, so I removed the screening and hardware cloth from the underside, and drilled much bigger holes. I added 7 or 8 coats of plasti-dip paint--both spray-on and paint-on--to completely protect the entryway floor from water.


After I cut the sheathing for the entryway, I coated the bottom edges of those boards with plasti-dip.


Here is the sheathing installed.


There is still some sheathing yet to install at the top of the entryway, but I was running out of daylight, so I cut the cedar boards for the entryway floor. I haven't installed them yet; I want to apply preservative first.


Also see:
Entryway 1
Entryway 2
Entryway 3
Entryway 4
Entryway 5
Entryway 7
Entryway 8

Autumn Bits and Pieces

I took today off of work to try to get a bunch done. It turned out to be my first work-in-the-yard day in quite some time that it did not rain at all, and I did end up getting a lot done.

During recent rainy days, I had put together a new house number sign for the end of the driveway. (The old one was falling apart; for some reason, woodpeckers had taken an interest in it.) I screwed the new sign onto the tree today. It looks normal during the daytime...


and is highly reflective at night. Since I've had to call an ambulance before, I want to be sure I'm easily found.


I renewed the JayBee's registration today. Only five months overdue! Since the JayBee has never been out on the road, it's not like it was illegal. But I do have to devise a better reminder system for myself, in order to keep up with it.


I stopped in to see the Code Enforcement Officer because I thought the JayBee's building permit had expired as well, but I found out that the expiration date on it doesn't apply since the work is underway. I actually have another year before it expires. Good thing, given the way I'm taking my time with this project.

Next, I worked on the door latch and dead bolt on my old house--the house I have to limp through yet another winter. The latch and the dead bolt haven't worked for a couple months now. Since the door hinges look fine, I thought the problem was possibly due to the extra humidity from the recent rain. I've been keeping the door closed with a chain and padlock, but this has gone on long enough that I decided I needed to fix the problem. I lowered the holes for the door latch and dead bolt by 1/4 inch, and now the door works perfectly!

Next, I moved on to the JayBee. Just as I started, the furnace-cleaning-guy arrived to clean my furnace. As long as the guy was there, I could only dub around with things on the JayBee because it became a major challenge to keep the two cats out of the guy's van (since he left the doors open the entire time) and out of the basement (since the entrance is through an outdoor bulkhead). At one point, on one of his many trips between the furnace and his van, the guy nodded his head toward the JayBee and asked, "What project have you got going there?" I explained that I am building a house on a trailer to live in so I can tear down the existing house. He exclaimed a few times and then summed it up by saying, "Not many people would take on a project like that!" I laughed and said, "With good reason." Once the guy left, I managed to get a bit done on the JayBee. See my next post--Entryway 6

At one point, after I brushed a "leaf" off the ladder, I realized it wasn't a leaf at all. It was a praying mantis. I used to love watching these when I was very young! I haven't seen one in many years, so this was a bit thrilling. She stayed so completely still, I thought she might be dead--but it was just a good act. She was very much alive.


Here is Bear acting all sedate and well-behaved--after the dramatic show of ill behavior earlier.


Bathroom Storage 2

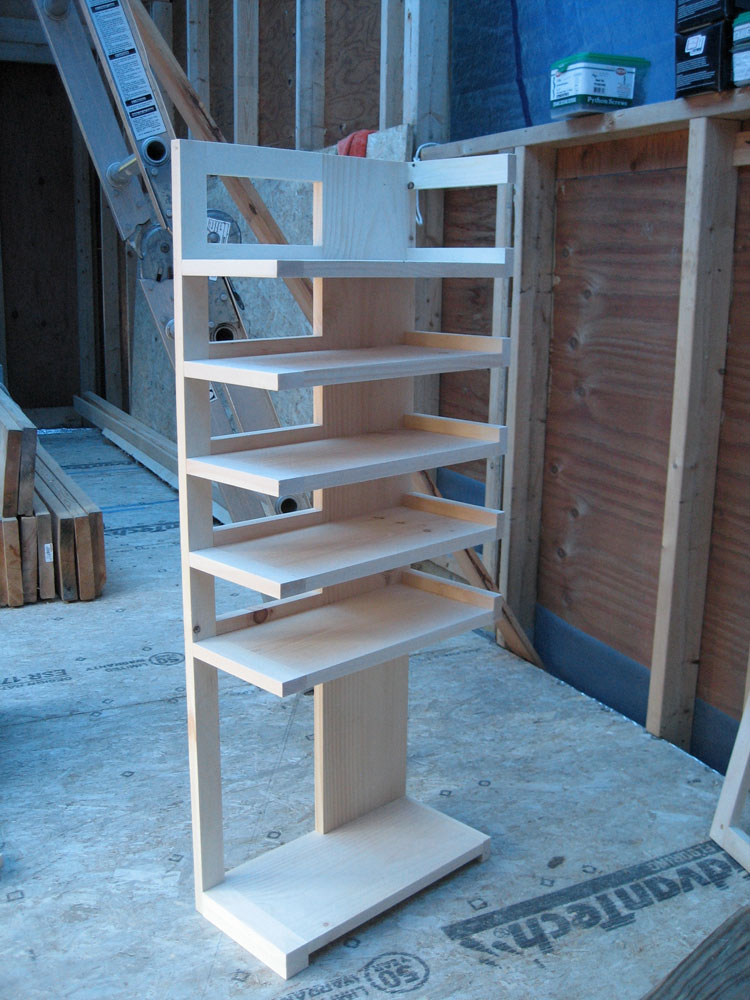
Here's the bathroom cabinet all finished and in use. It won't sit on the floor of the JayBee; it will be hung on the wall. I decided to use it now not only to have a place to store it until the JayBee is ready for it, but also because it has been helping me downsize my bathroom crap. I've been trying to fit everything that isn't a tall bottle into this cabinet. I've been chucking everything else. Can you say prescriptions dating back to 1995? Yup, it's that bad.


In case anyone is wondering how I come up with these ideas, some of them I cook up completely from scratch (see the office corkboard wall); others, like this bathroom cabinet, start with a bit of inspiration to which I apply a bit of creative modification. The inspiration for this cabinet came from Ridiculously Simple Furniture Projects by Spike Carlsen. I found baskets that would fit in the space I knew I had in the corner of the JayBee's bathroom. I modified Carlsen's design to fit my baskets, to have solid shelves, and to have straight up-and-down sides rather than decorative molding around the top (to make it easier to install flush into the corner of the bathroom). Sometimes I draw accurate plans to scale; this time, I just did a quick sketch before starting to build. (The construction process is detailed in Bathroom Storage 1.)


Also see:

Thursday, September 27, 2012

Bathroom Storage 1

I need to catch up with posting. To begin, here's some info. about a cabinet I built for the JayBee's bathroom. Yes, I am very much aware that it would make more sense to have the outside of a house completed first, before building cabinets and such. However, we have had a lot of rain during the last several weekends. Rather than not work at all on the JayBee when it's raining, I've been using those moments to make progress on this cabinet I've had in my head for awhile. The plan is to install this cabinet in the northwest corner of the JayBee, next to the toilet.

First, I cut all the parts out of pine.


I connected the pieces of the sides of the cabinets using dowel pins, and glued and clamped them.


I pre-drilled a gazillion holes. (Yes, precisely a gazillion.)


I connected the back pieces to one side piece with screws,


and screwed in the shelves. Each shelf is made with two pieces of pine glued together with biscuits. Adding the front piece to each shelf ensured the front edge of each shelf would not be end grain.


Below is the cabinet with the other side and the top connected. The top is made with two pieces of wood glued together with biscuits.


It took 74 pegs to fill all the screw holes. Okay, not exactly a gazillion. Even though I think one side and the back will not be visible (I plan to attach the cabinet in the corner up off the floor rather than use it as a freestanding unit), I figured I'd finish all the holes so it could have other potential future uses as well.


After I'd trimmed all the pegs and sanded the whole cabinet, I made sure these baskets will fit in the cabinet the way I envisioned.


I'll add another image or two after I apply some stain and finish.


Also see:
Bathroom Storage 2

Sunday, August 26, 2012

Entryway 5

It occurred to me that I really needed to at least partially install the ceiling joists in the entryway before connecting the entry walls together. So I cut the small joists...


...tipped the wall back so I could set the joists in place...


...then tipped the wall back up, and screwed together the remaining two walls of the entryway. I added a second top plate to the top of the entryway walls.


I cut out the 2 x 4 across the base of the doorway...


...and attached the ceiling joists in place. (They are spaced in an odd way in anticipation of an exterior ceiling light being installed at some point.)


Also see:
Entryway 1
Entryway 2
Entryway 3
Entryway 4
Entryway 6
Entryway 7
Entryway 8